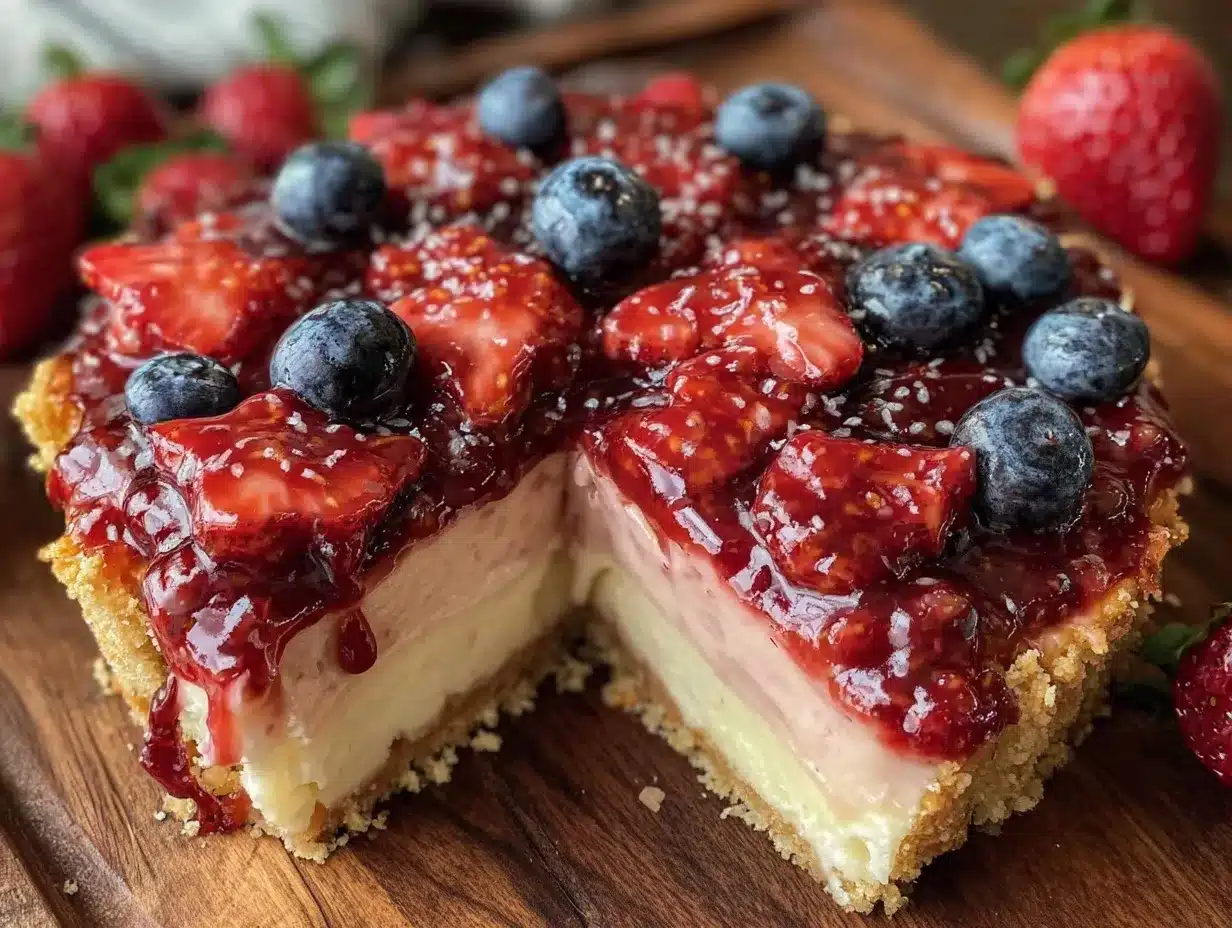
There used to be this little café tucked away on a quiet street in Charleston that made the most unforgettable no-bake strawberry cheesecake flag tart. When they suddenly closed last summer, I was honestly heartbroken. That tart wasn’t just a dessert; it was a celebration on a plate—bright red strawberries, creamy cheesecake, and those perfect blueberry stars that somehow tasted like summer itself. I mean, you know that feeling when a place closes and you keep dreaming about their food? That was me, day after day, with this tart.
After about seven tries—yes, seven!—and more than a few messy kitchen counters (I once forgot to chill the crust and ended up with a crumbly disaster), I finally got it. The exact balance of creamy, tangy, and fresh that made that dessert stand out is now right in my own fridge. Let me tell you, it’s been worth every spilled strawberry and late-night mixing session. This Perfect No-Bake Strawberry Cheesecake Flag Tart with Fresh Blueberry Stars has become my go-to for summer gatherings, and honestly, I think you’ll love making it as much as eating it.
Maybe you’ve been there too—missing a dessert that just can’t be replaced. If so, this recipe is a little love letter to those memories, with a fresh twist to make it your own. Let’s get into it!
Why You’ll Love This Recipe
This no-bake strawberry cheesecake flag tart isn’t just pretty—it’s downright delicious and surprisingly easy. I’ve tested this recipe multiple times with friends and family, so it’s definitely family-approved and perfect for impressing guests without the stress.
- Quick & Easy: Ready in under an hour, including chilling time, which makes it perfect for busy summer days or last-minute celebrations.
- Simple Ingredients: No need for fancy or hard-to-find items. You likely have most of these in your pantry or fridge already.
- Perfect for Patriotic Holidays & Summer Parties: This dessert shines at 4th of July barbecues, Memorial Day picnics, or any festive occasion.
- Crowd-Pleaser: Both kids and adults rave about the creamy cheesecake filling paired with fresh fruit.
- Unbelievably Delicious: That creamy, smooth cheesecake layer contrasts beautifully with the fresh, juicy strawberries and sweet blueberries on top.
What makes this recipe stand out? It’s the no-bake method that keeps things simple but still delivers that rich cheesecake flavor. Plus, the fresh blueberry stars add a fun, festive touch without extra fuss. Honestly, it’s the kind of dessert that makes you close your eyes after the first bite and just savor the moment. Whether you’re a cheesecake pro or a newbie, this tart is the perfect balance of ease and wow-factor.
What Ingredients You Will Need
This recipe uses simple, wholesome ingredients to deliver bold flavor and a satisfying texture without any complicated steps. Most are pantry staples, with fresh fruit making it feel special and seasonal.
- For the Crust:
- 1 ½ cups (150g) graham cracker crumbs (I prefer Honey Maid for that classic flavor)
- 5 tbsp (70g) unsalted butter, melted (adds richness and helps bind the crust)
- 2 tbsp (25g) granulated sugar
- For the Cheesecake Filling:
- 16 oz (450g) cream cheese, softened (use Philadelphia cream cheese for best texture)
- ¾ cup (90g) powdered sugar, sifted
- 1 tsp vanilla extract
- 1 ½ cups (360ml) heavy whipping cream, cold (for that fluffy, creamy texture)
- For the Topping:
- 2 cups (300g) fresh strawberries, sliced (look for firm, ripe berries)
- 1 cup (150g) fresh blueberries (for the stars)
Substitution tips: Use gluten-free graham cracker crumbs if you need a gluten-free option. You can swap heavy cream with coconut cream for a dairy-free version, but the texture will be slightly different. In summer, sometimes I swap strawberries for fresh raspberries if they’re at their peak.
Equipment Needed
- 9-inch (23 cm) tart pan with removable bottom (makes removing the tart easier and cleaner)
- Mixing bowls (one large for the filling, one medium for the crust)
- Electric mixer or stand mixer with whisk attachment (helps whip the cream perfectly)
- Rubber spatula (great for folding the whipped cream into the cream cheese)
- Measuring cups and spoons
- Knife and cutting board (for slicing strawberries and shaping blueberry stars)
- Optional: star-shaped cookie cutter (to neatly cut the blueberries into star shapes; if you don’t have one, no worries, just arrange the berries in star shapes)
I’ve tried using a springform pan before, but the tart pan’s removable bottom really makes a difference in presentation. If you’re on a budget, you can find affordable tart pans online or at local kitchen stores, and they last forever if you take care of them. Just hand wash and dry immediately to prevent rust.
Preparation Method
- Prepare the crust: In a medium bowl, mix the graham cracker crumbs, melted butter, and sugar until the mixture looks like wet sand. Press it firmly and evenly into the bottom of your 9-inch tart pan. Use the bottom of a glass or measuring cup to press down tightly. Chill in the fridge for at least 15 minutes to set while you prepare the filling.
- Make the cheesecake filling: In a large mixing bowl, beat the softened cream cheese with an electric mixer on medium speed until smooth and creamy, about 2 minutes. Add the powdered sugar and vanilla extract, then beat until fully combined and smooth.
- Whip the cream: In a separate chilled bowl, whip the heavy cream on high speed until stiff peaks form. This usually takes about 3-4 minutes, so keep an eye on it to avoid overwhipping, which can turn it grainy.
- Fold the whipped cream into the cream cheese mixture: Using a rubber spatula, gently fold about one-third of the whipped cream into the cream cheese mixture to lighten it. Then fold in the remaining whipped cream carefully to keep it airy and fluffy. The filling should look smooth and soft.
- Assemble the tart: Spoon the cheesecake filling over the chilled crust, spreading it evenly with a spatula. Chill the tart for at least 2 hours, or until firm enough to slice cleanly.
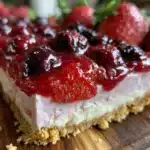
- Decorate with the fruit: Arrange the sliced strawberries in neat stripes across the tart to mimic the American flag’s stripes. Then, use the fresh blueberries to form stars in the upper left corner of the tart. If you have a small star-shaped cookie cutter, you can gently press it into the blueberries to create neat star shapes, or simply arrange the berries into a star pattern carefully.
- Final chill and serve: Place the decorated tart back into the fridge for 30 minutes so the fruit sets a bit. When ready, run a knife around the edges before removing the tart pan’s rim for a clean presentation. Slice and enjoy!
Pro tip: If your cream cheese is too cold, it can cause lumps. Let it soften at room temperature for about 30 minutes before mixing. Also, if you’re pressed for time, chilling the tart overnight works perfectly and actually helps the flavors meld.
Cooking Tips & Techniques
One of the trickiest parts of this no-bake tart is getting that creamy filling just right. Here’s what I’ve learned over the years:
- Softening cream cheese: Don’t rush this step. Soft cream cheese blends much smoother and prevents lumps in your filling.
- Whipping cream: Use chilled heavy cream and a cold bowl for best results. I even pop my mixing bowl in the fridge for 15 minutes beforehand. Watch closely—overwhipping will turn it grainy, and underwhipping leaves it too loose.
- Folding technique: Gently fold the whipped cream into the cream cheese mixture rather than stirring vigorously. This keeps the filling light and airy instead of dense.
- Crust pressing: Press the crust firmly to avoid a crumbly base that falls apart when slicing.
- Fruit arrangement: Take your time placing the strawberries and blueberries. It’s the visual wow-factor that makes this tart so memorable.
I remember the first time I tried to shape the blueberry stars, I ended up smushing the berries because I was too heavy-handed. Patience is key here! Also, prepping the crust and filling ahead of time can save you a lot of stress on the day you want to serve the tart.
Variations & Adaptations
While this recipe is great as is, it’s super flexible to fit different needs or flavor twists. Here are some ideas I’ve played with:
- Dairy-Free Version: Swap cream cheese and heavy cream for coconut-based alternatives. Use a dairy-free graham cracker crust to keep it completely plant-based.
- Berry Mix-Up: Replace strawberries with raspberries or sliced kiwi for a different color palette. Blueberries can be swapped with blackberries for a richer star look.
- Gluten-Free Crust: Use almond flour or gluten-free graham cracker crumbs to make the crust safe for gluten-sensitive guests.
- Mini Tarts: Make individual-sized tartlets using a muffin tin lined with tart dough for portion control at parties.
- Extra Zing: Add a tablespoon of lemon zest to the filling for a bright citrus note that balances the sweetness.
Once, I even drizzled a little balsamic reduction over the fruit for a gourmet twist, and it was surprisingly delicious! Feel free to get creative and make this recipe your own.
Serving & Storage Suggestions
This cheesecake tart is best served chilled, straight from the fridge. The cool, creamy texture pairs wonderfully with the fresh fruit topping. I like to slice it into generous wedges and serve it alongside a light sparkling lemonade or even a crisp rosé for grown-up gatherings.
To store, cover the tart loosely with plastic wrap or place it in an airtight container and keep it refrigerated. It will stay fresh for up to 3 days, but honestly, it rarely lasts that long around here!
If you need to store it longer, you can freeze the uncut tart for up to 1 month. Just thaw it overnight in the fridge before serving. When reheating, avoid the microwave; just let it come to room temperature to keep the texture perfect.
Fun fact: the flavors actually deepen after a day, so sometimes I make it a day ahead to get that perfect balance of sweetness and tang.
Nutritional Information & Benefits
This no-bake strawberry cheesecake tart offers a delightful mix of indulgence and fresh fruit nutrition. Here’s a rough estimate per serving (assuming 12 slices):
- Calories: ~280
- Fat: 18g (mostly from cream cheese and butter)
- Carbohydrates: 25g (from crust and fruit)
- Protein: 4g
Strawberries and blueberries are packed with antioxidants and vitamin C, adding a healthy boost alongside the rich, creamy filling. If you’re mindful of carbs, swapping the crust for almond flour lowers the carb count significantly. This dessert can fit gluten-free and vegetarian diets easily with the right ingredient swaps.
Personally, I appreciate that this tart brings fresh fruit front and center, balancing the cheesecake’s richness with natural sweetness and fiber.
Conclusion
This Perfect No-Bake Strawberry Cheesecake Flag Tart with Fresh Blueberry Stars is more than just a festive dessert—it’s a joyful tradition in the making. Whether you’re celebrating a holiday, hosting friends, or just craving a sweet treat that looks stunning and tastes even better, this recipe delivers. I love how it’s approachable yet impressive, and how the fresh fruit keeps it feeling light and summery.
Feel free to personalize it with your favorite berries or add a splash of lemon zest to suit your taste. I’d love to hear how you make it your own—drop a comment or share your variations!
Now, grab your mixing bowls and tart pan—let’s get that flag tart on your table and create some sweet, happy memories.
FAQs
Can I make this tart ahead of time?
Absolutely! You can prepare the crust and filling a day ahead and assemble the fruit topping just before serving for the freshest look.
What if I don’t have a tart pan with a removable bottom?
You can use a regular pie dish, but removing the tart will be trickier. Serving straight from the dish works fine, or use parchment paper to help lift it out.
Can I use frozen berries instead of fresh?
It’s best to use fresh berries for this tart to avoid excess moisture making the crust soggy. If using frozen, thaw and pat dry thoroughly.
Is this recipe suitable for kids?
Yes! Kids love the creamy texture and colorful fruit design. Just be mindful of any allergies to dairy or gluten and adapt accordingly.
How do I keep the crust from getting soggy?
Press the crust firmly and chill it well before adding the filling. Also, avoid adding very juicy fruit directly on the crust without the cheesecake layer as a barrier.
Pin This Recipe!
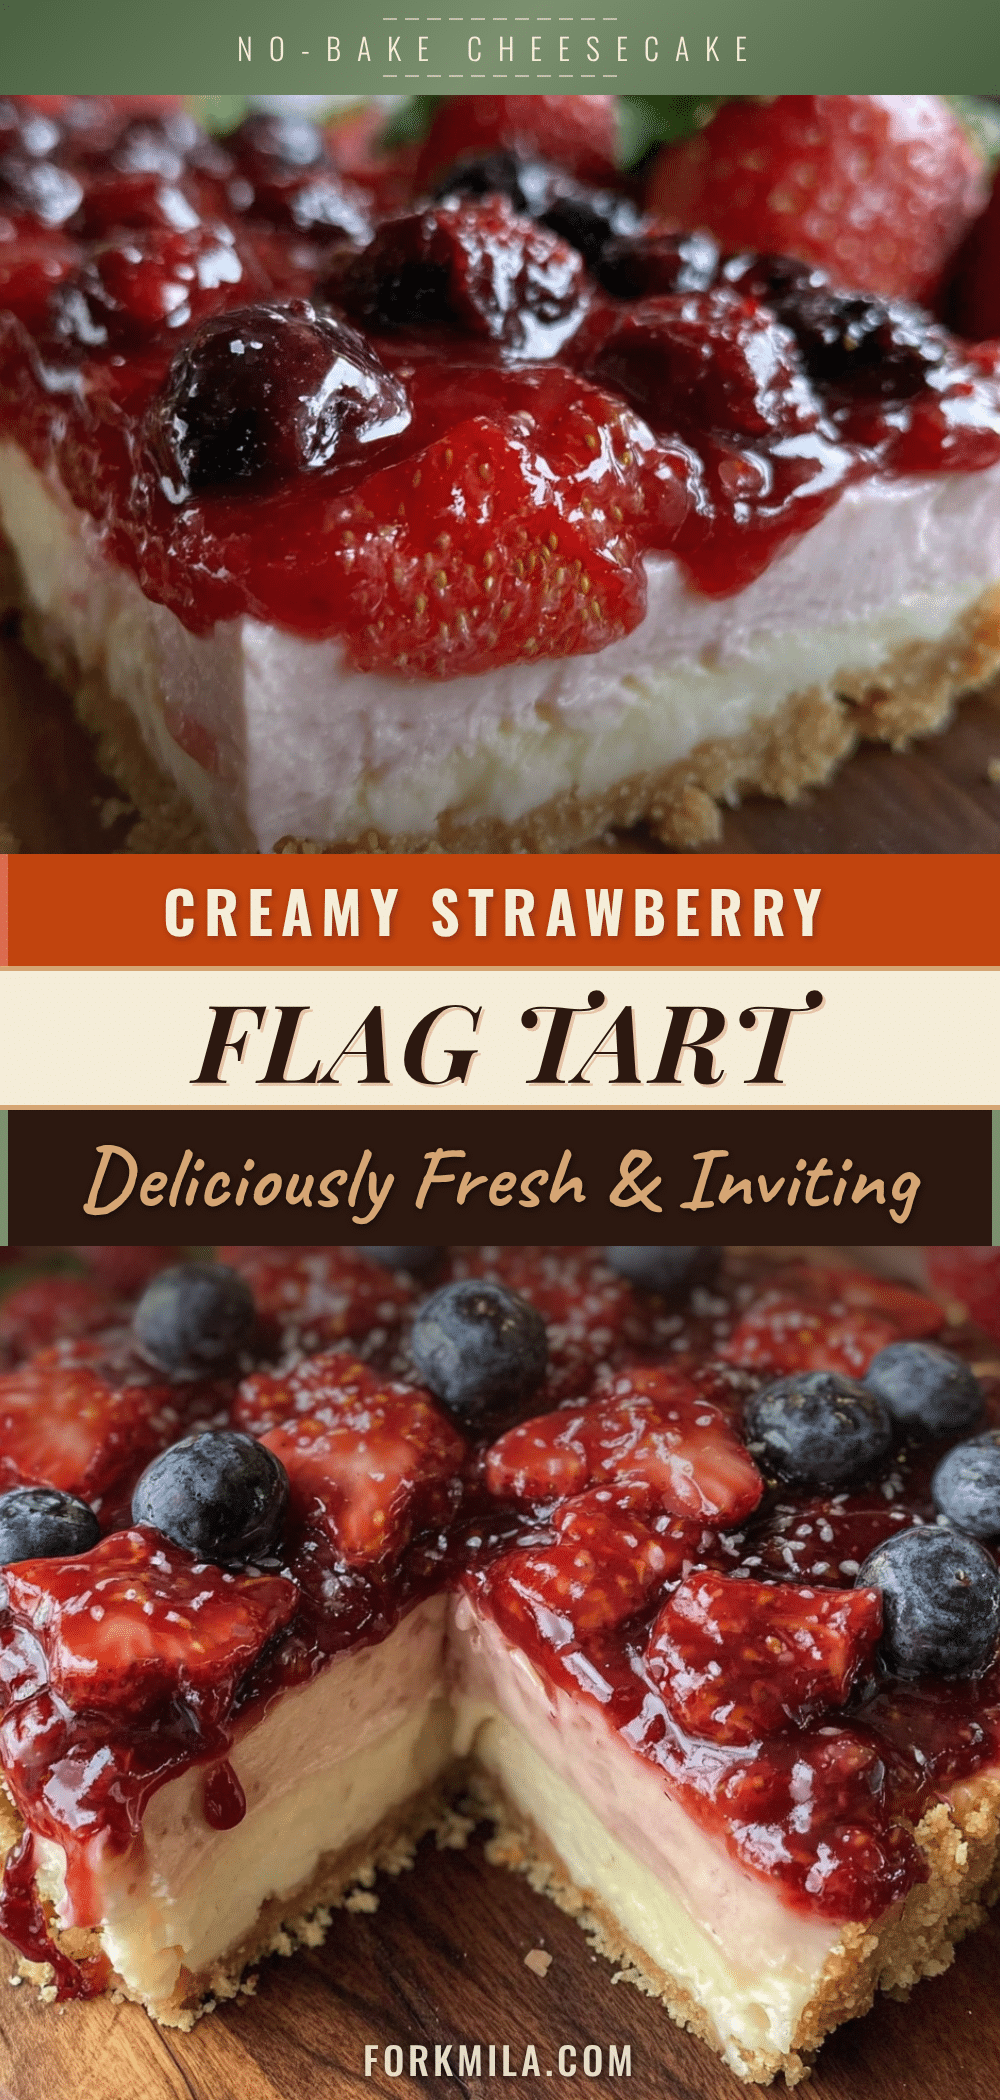
Perfect No-Bake Strawberry Cheesecake Flag Tart
A creamy, no-bake strawberry cheesecake tart decorated with fresh blueberries in a patriotic flag design. Easy to make and perfect for summer gatherings and holidays.
- Prep Time: 20 minutes
- Cook Time: 0 minutes
- Total Time: 2 hours 50 minutes
- Yield: 12 servings 1x
- Category: Dessert
- Cuisine: American
Ingredients
- 1 ½ cups (150g) graham cracker crumbs
- 5 tbsp (70g) unsalted butter, melted
- 2 tbsp (25g) granulated sugar
- 16 oz (450g) cream cheese, softened
- ¾ cup (90g) powdered sugar, sifted
- 1 tsp vanilla extract
- 1 ½ cups (360ml) heavy whipping cream, cold
- 2 cups (300g) fresh strawberries, sliced
- 1 cup (150g) fresh blueberries
Instructions
- Prepare the crust: In a medium bowl, mix the graham cracker crumbs, melted butter, and sugar until the mixture looks like wet sand. Press it firmly and evenly into the bottom of a 9-inch tart pan. Chill in the fridge for at least 15 minutes.
- Make the cheesecake filling: Beat the softened cream cheese with an electric mixer on medium speed until smooth, about 2 minutes. Add powdered sugar and vanilla extract, then beat until smooth.
- Whip the cream: In a separate chilled bowl, whip the heavy cream on high speed until stiff peaks form, about 3-4 minutes.
- Fold the whipped cream into the cream cheese mixture gently to keep it airy and fluffy.
- Assemble the tart: Spoon the cheesecake filling over the chilled crust and spread evenly. Chill for at least 2 hours until firm.
- Decorate with fruit: Arrange sliced strawberries in stripes and fresh blueberries as stars in the upper left corner. Use a star-shaped cookie cutter for neat blueberry stars if desired.
- Final chill and serve: Chill the decorated tart for 30 minutes. Run a knife around the edges before removing the tart pan rim. Slice and enjoy.
Notes
Let cream cheese soften at room temperature for 30 minutes to avoid lumps. Chill mixing bowl before whipping cream. Fold whipped cream gently to keep filling airy. Press crust firmly to avoid crumbling. Chill tart overnight for best flavor melding. Use fresh berries for best results. Can substitute gluten-free or dairy-free ingredients as needed.
Nutrition
- Serving Size: 1 slice (1/12 of tar
- Calories: 280
- Fat: 18
- Carbohydrates: 25
- Protein: 4
Keywords: no-bake cheesecake, strawberry tart, patriotic dessert, summer dessert, 4th of July dessert, blueberry stars, easy cheesecake