I was at my local library’s annual book sale, elbow-deep in a bin of stained cookbooks priced at fifty cents each, when the woman next to me—a retired art teacher with flour dusted on her sweater—started talking about focaccia. Not just any focaccia, she specified, but the kind made with sourdough discard, the kind that turns your kitchen into a bakery for an entire afternoon. I wasn’t looking for a bread recipe that day, honestly. I was hunting for a decent cookie book. But she pulled out a spiral-bound community cookbook from 1987, flipped to a page with a grease spot the size of a silver dollar, and said, “This one. This is the one you need.” I bought the cookbook for a quarter, and let me tell you, that was the best quarter I ever spent.
I tried her recommended recipe that same week, and the result was good—but not great. The crumb was a little tight, the top a bit pale. So I did what any slightly obsessed home cook would do: I spent the next eight weekends tweaking it. I tested different hydration levels, longer proofing times, and various olive oil ratios. I burned a batch, forgot the salt in another, and once used rosemary that had been sitting in my pantry since 2019 (don’t do that). But eventually, I landed on a version that made me stop mid-bite and just stare at the bread. This is that recipe. Maybe you’ve been there with sourdough discard—a jar in the fridge that seems to multiply overnight, and you’re tired of pancakes. This focaccia is your answer.
Why You’ll Love This Recipe
This isn’t just another focaccia recipe you’ll find floating around the internet. I’ve tested this version over a dozen times, tweaking hydration percentages and fermentation windows until the texture hit that perfect balance—crispy on the bottom, airy in the middle, and golden on top. As someone who has taught sourdough workshops to nervous beginners, I can tell you this: if you can stir, you can make this bread.
- Quick & Easy: While traditional sourdough bread requires a full day of babysitting, this focaccia comes together with about 15 minutes of active work. The rest is just waiting (and smelling amazing things happening in your oven).
- Simple Ingredients: You likely have everything in your kitchen right now. Flour, water, olive oil, salt, rosemary, and that jar of discard staring at you from the fridge door.
- Perfect for Beginners: Focaccia is the most forgiving bread you’ll ever make. No shaping skills required. No scoring. No steam pans. Just dimple, drizzle, and bake.
- Crowd-Pleaser: I’ve brought this to potlucks, dinner parties, and casual hangouts. It disappears every single time. People fight over the corner pieces with the most rosemary.
- Unbelievably Delicious: The combination of tangy sourdough discard, fruity olive oil, and piney rosemary creates a flavor profile that’s complex but approachable. It’s the kind of bread that makes you close your eyes after the first bite.
What makes this recipe different is the overnight cold fermentation. Most discard focaccia recipes rush the process, but letting the dough rest in the fridge for 12-24 hours develops deeper flavor and that signature open crumb. It’s not just another version—it’s the version I’d serve to anyone who claims they don’t like sourdough.
What Ingredients You Will Need
This recipe uses simple, pantry-friendly ingredients to create something that tastes far more complicated than it is. The magic happens in how these humble components interact over time.
- All-purpose flour: 500g (about 4 cups), plus extra for dusting. I prefer King Arthur Flour for consistent protein content, but any brand works. Bread flour will give you a chewier crumb; all-purpose keeps it tender.
- Sourdough discard: 200g (about 1 cup), straight from the fridge. Unfed, cold, and neglected—that’s perfect. Active starter also works, but discard is the whole point here.
- Warm water: 350g (about 1.5 cups), around 85°F. Not hot enough to kill the yeast activity, but warm enough to wake things up.
- Olive oil: 60g (about 1/4 cup) for the dough, plus 2-3 tablespoons for the pan and topping. Use a good-quality extra virgin olive oil here—you’ll taste it.
- Salt: 10g (about 1.5 teaspoons) fine sea salt. Don’t skip this or reduce it; salt controls fermentation and builds flavor.
- Fresh rosemary: 2 tablespoons, finely chopped. Dried rosemary works in a pinch, but fresh gives you that aromatic punch that makes focaccia unforgettable.
- Flaky sea salt: For topping, optional but highly recommended. Maldon is my go-to.
Ingredient Tips: For the best texture, weigh your flour and water instead of using measuring cups. It makes a real difference in hydration accuracy. If your discard has been sitting for weeks and smells extra tangy (like nail polish remover), that’s actually perfect—that acidity adds incredible depth to the final bread. Just make sure it doesn’t have any mold on top.
Equipment Needed
You don’t need a stand mixer or any fancy gadgets for this recipe. Focaccia is the people’s bread.
- Large mixing bowl: Glass or ceramic works best. Avoid metal bowls if you can—they conduct temperature differently and can cool the dough too quickly.
- 9×13-inch baking pan: Metal is ideal for crispy bottoms. Glass or ceramic works but may need an extra 5 minutes of baking time.
- Bench scraper: Optional but helpful for handling the sticky dough. A flexible spatula works too.
- Kitchen scale: I know I sound like a broken record, but weighing ingredients transforms your baking. A $15 scale will do the job.
- Plastic wrap or a shower cap: For covering the dough during proofing. Reusable bowl covers are great too.
- Refrigerator space: You’ll need a flat spot in your fridge for the overnight rest.
Budget Tip: If you don’t have a 9×13 pan, use a cast iron skillet or even a disposable aluminum pan. The shape doesn’t matter as much as the depth—you want the dough to spread to about 1-inch thickness before baking.
Preparation Method
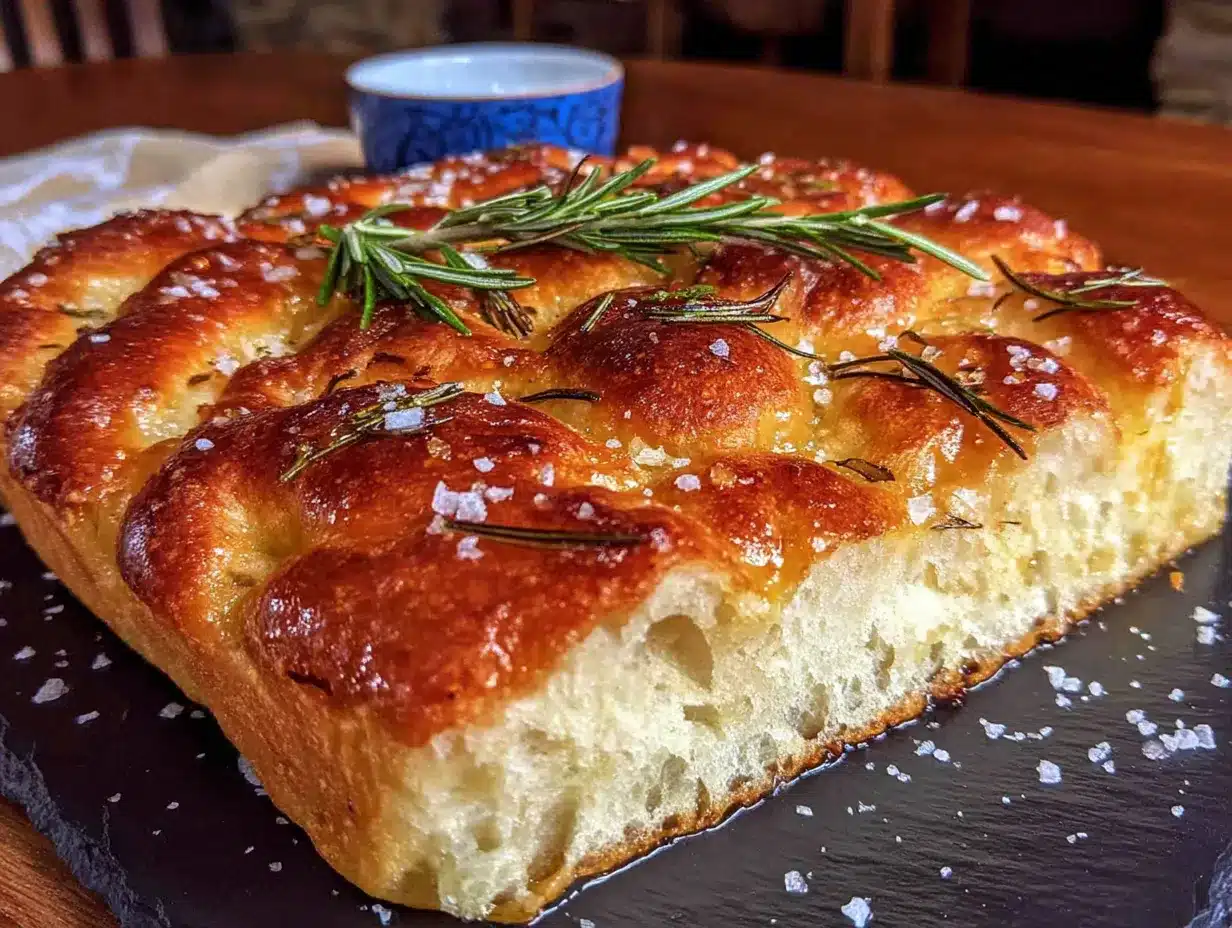
Let’s walk through this step by step. I’ve included all my little tricks and troubleshooting notes along the way.
- Mix the dough (5 minutes): In your large bowl, combine the warm water and sourdough discard. Stir until the discard mostly dissolves—some small lumps are fine. Add the olive oil and salt, then dump in all the flour at once. Stir with a rubber spatula or your hand until no dry flour remains. The dough will look shaggy and rough. That’s exactly right. Cover the bowl with plastic wrap and let it rest for 30 minutes. This is called the autolyse, and it gives the flour time to absorb the water, making the dough easier to handle later.
- Stretch and fold (30 seconds each, 3 rounds): After the rest, wet your hand slightly (sticky dough is easier to handle with wet fingers). Grab one side of the dough, stretch it up, and fold it over the center. Rotate the bowl 90 degrees and repeat. Do this four times total—one full rotation. Cover and rest 30 minutes. Repeat the stretch and fold process two more times, with 30-minute rests in between. You’ll notice the dough becoming smoother and more elastic with each round. After the third set, the dough should feel alive and bouncy.
- Cold ferment (12-24 hours): Cover the bowl tightly with plastic wrap and place it in the refrigerator. This is where the magic happens. The long, slow fermentation develops that tangy sourdough flavor and creates the airy crumb structure. Don’t rush this step. I’ve tested 8 hours versus 24 hours, and the difference is dramatic. Go for the full day if you can.
- Prepare the pan (5 minutes): The next day, pour 2 tablespoons of olive oil into your 9×13 pan. Use your fingers to spread it all over the bottom and up the sides. The oil prevents sticking and helps create that crispy, golden bottom crust.
- Transfer and stretch (5 minutes): Remove the cold dough from the fridge. It will be stiff and cold—that’s fine. Scoop it out into the oiled pan. Don’t try to force it into shape immediately. Let it sit uncovered for 20 minutes to relax. Then, using oiled fingertips, gently stretch the dough toward the corners of the pan. If it resists and springs back, let it rest another 10 minutes and try again. Patience here prevents tearing.
- Final proof (2-3 hours): Cover the pan loosely with plastic wrap or a clean kitchen towel. Let it rise at room temperature until the dough is puffy, bubbly, and nearly doubled in volume. This can take anywhere from 2 to 4 hours depending on your kitchen temperature. In my cold kitchen (68°F), it takes about 3 hours. You’ll know it’s ready when you poke it gently and the indentation stays rather than springing back.
- Dimple and top (5 minutes): Preheat your oven to 425°F about 30 minutes before the dough is ready. When the dough has proofed, drizzle 1-2 tablespoons of olive oil over the top. Then, using oiled fingertips, press deep dimples all over the surface—all the way down to the bottom of the pan. Don’t be shy. The dimples hold the oil and rosemary, creating those signature focaccia pockets. Sprinkle the chopped rosemary evenly over the top, followed by flaky sea salt if using.
- Bake (25-30 minutes): Place the pan on the middle rack of your preheated oven. Bake until the top is deep golden brown and the bottom is crispy—about 25-30 minutes. If the top is browning too quickly but the bottom isn’t done, tent loosely with foil for the last 5-10 minutes. You’ll know it’s done when the internal temperature reaches 200°F on an instant-read thermometer.
- Cool (10 minutes, minimum): Let the focaccia cool in the pan for 5 minutes, then transfer to a wire rack. I know it’s tempting to tear into it immediately, but letting it cool for at least 10 minutes allows the steam to redistribute and the structure to set. The wait is worth it.
Cooking Tips & Techniques
I’ve made every mistake in the book with this recipe so you don’t have to. Here’s what I learned the hard way.
Don’t skip the cold ferment. The first time I made this, I was impatient and baked it after just 4 hours at room temperature. The result was flat, dense, and tasted more like salty bread than sourdough focaccia. That overnight rest in the fridge isn’t just convenient—it’s essential for developing that complex, tangy flavor and open crumb. The cold also makes the dough much easier to handle during the transfer to the pan.
Oil is not optional. I once tried to reduce the olive oil to save calories. Big mistake. The focaccia came out dry, pale, and sad. The oil in the pan creates a fried bottom crust that’s absolutely essential to the focaccia experience. The oil on top keeps the crust tender while allowing it to crisp. Don’t skimp.
Dimple with confidence. The first time I made focaccia, I barely pressed into the dough, afraid I’d deflate it. The result was a flat top with no texture. You need to press all the way down to the bottom of the pan. Yes, it deflates the dough a bit, but the oven spring will bring it right back. Those deep dimples turn into pools of olive oil and rosemary that make every bite incredible.
Watch your water temperature. If you’re using discard straight from the fridge, use slightly warmer water (around 90°F) to compensate. If your kitchen is cold, use warm water. If it’s a hot summer day, use room temperature water. The goal is a dough temperature of around 75-78°F after mixing. Too cold, and fermentation slows to a crawl. Too hot, and you risk over-fermentation and a sour, flat bread.
Multitasking tip: While the dough does its final proof (step 6), that’s the perfect time to prep your rosemary, measure your flaky salt, and clean up your kitchen. The active work in this recipe is minimal, but the timing matters. Set a timer for the dimpling step so you don’t forget and let the dough over-proof.
Variations & Adaptations
Once you’ve mastered the basic recipe, the possibilities are endless. Here are some variations I’ve tested and loved.
Herb and Garlic Focaccia: Skip the rosemary and add 3 cloves of minced garlic and 1 tablespoon of dried oregano to the olive oil before dimpling. The garlic roasts into sweet, mellow pockets that pair beautifully with the tangy sourdough. I made this for a pasta dinner once, and my friend asked for the recipe before she finished her first piece.
Everything Bagel Focaccia: After dimpling, sprinkle the top with a generous layer of everything bagel seasoning (sesame seeds, poppy seeds, dried garlic, dried onion, and salt). The seeds toast in the oven and create an incredible crunchy crust. This version is dangerous because you’ll eat half the pan standing at the counter.
Gluten-Free Adaptation: Substitute the all-purpose flour with a good gluten-free bread flour blend (I like Cup4Cup). Increase the water by 50g since gluten-free flours absorb more liquid. Skip the stretch and folds (they won’t help without gluten) and instead mix the dough thoroughly with a spoon. The texture will be denser and more cake-like, but the flavor is still fantastic. I’ve served this to gluten-free friends who said it was the best bread they’d had in years.
Caramelized Onion and Thyme: While the dough does its final proof, caramelize 2 large sliced onions in 2 tablespoons of olive oil over low heat for about 30 minutes. Let them cool slightly, then press them into the dimpled dough along with fresh thyme leaves. The sweetness of the onions against the tangy sourdough is a match made in heaven.
Serving & Storage Suggestions
This focaccia is at its absolute best served warm, within an hour of baking. The crust is still crispy, the interior is pillowy, and the olive oil and rosemary are at their most aromatic.
Serving temperature: Room temperature or warm. If you’ve let it cool completely, reheat it in a 350°F oven for 5-7 minutes to revive the crust. Don’t microwave it—the crust will turn rubbery and sad.
What to serve with it: Focaccia is incredibly versatile. Serve it alongside a bowl of tomato soup for a classic combo, use it for sandwiches (try it with prosciutto, fresh mozzarella, and arugula), or tear it into pieces and dip it in balsamic vinegar and olive oil. It’s also fantastic as a side for pasta dishes, grilled meats, or salads. I once made a Thanksgiving stuffing using day-old focaccia, and it was life-changing.
Storage instructions: Store leftover focaccia in an airtight container or wrapped tightly in plastic wrap at room temperature for up to 2 days. After that, the texture starts to decline. Do not refrigerate it—the fridge dries out bread faster than anything.
Freezing instructions: Focaccia freezes beautifully. Cool it completely, then wrap it tightly in plastic wrap, followed by a layer of aluminum foil. Freeze for up to 3 months. To thaw, leave it at room temperature for about 2 hours, then reheat in a 350°F oven for 10 minutes. The crust will be almost as good as fresh.
Flavor development: Interestingly, the sourdough flavor actually deepens after the focaccia sits for a day. If you can resist eating it all immediately, the leftovers make incredible croutons or breadcrumbs. Just cube the stale focaccia, toss with olive oil and salt, and bake at 375°F for 15 minutes.
Nutritional Information & Benefits
While focaccia isn’t health food, this version offers some surprising benefits thanks to the sourdough fermentation process.
Estimated per serving (1/12 of recipe): Calories: 220, Fat: 8g, Carbohydrates: 32g, Protein: 5g, Fiber: 1g, Sodium: 380mg. These values will vary based on exact ingredients and portion sizes.
Health benefits of sourdough fermentation: The long fermentation process breaks down phytic acid, which is an antinutrient that can interfere with mineral absorption. This means your body can better absorb the iron, zinc, and magnesium in the flour. Sourdough also has a lower glycemic index compared to regular bread, meaning it causes a slower, steadier rise in blood sugar. Some studies suggest that the lactic acid bacteria in sourdough can improve gut health.
Dietary considerations: This recipe is vegetarian, dairy-free, and egg-free. For a vegan version, simply ensure your sugar (if using any) is vegan-friendly. It contains gluten, so it’s not suitable for celiacs unless you use the gluten-free adaptation mentioned above. The olive oil provides heart-healthy monounsaturated fats, and the rosemary is rich in antioxidants and anti-inflammatory compounds.
Personal perspective: I don’t believe in demonizing bread or any food. This focaccia is a treat, something to enjoy in moderation as part of a balanced diet. The fact that it’s made with sourdough discard—a byproduct that would otherwise go to waste—makes me feel a little better about indulging. It’s not health food, but it’s honest food made with real ingredients and a lot of patience.
Conclusion
This sourdough discard focaccia has become a staple in my kitchen, and I have a feeling it will become one in yours too. It’s the recipe I turn to when I need to use up discard, when I want to impress dinner guests without breaking a sweat, or when I simply want the house to smell like a bakery on a Sunday afternoon.
The beauty of this recipe is how forgiving it is. You don’t need to be a professional baker. You don’t need fancy equipment. You just need a little patience, a jar of discard, and the willingness to get your hands a bit oily. The first time you pull a golden, rosemary-flecked focaccia out of the oven, you’ll understand why I spent eight weekends perfecting it. The crispy bottom, the airy crumb, the way the olive oil pools in those dimples—it’s worth every minute of waiting.
I’d love to hear how yours turns out. Did you try a variation? Did you burn it and learn something? Did you eat half the pan before it cooled? Drop a comment below and tell me about it. And if you’re looking for another way to use up sourdough discard, check out my crispy sourdough discard crackers—they come together in half the time and are perfect for snacking.
Happy baking, friends. Go make some dimples.
Frequently Asked Questions
Can I use active sourdough starter instead of discard?
Yes, absolutely. Active starter will work, but it will ferment faster, so keep an eye on the proofing times. You may need to reduce the final proof by about 30 minutes. The flavor will be slightly milder since the starter is at its peak rather than being tangy and acidic.
Why is my focaccia dense and not airy?
This usually happens for one of three reasons: the dough wasn’t hydrated enough (add a bit more water next time), the fermentation was too short (give it more time), or you handled the dough too roughly during the dimpling step (be gentle but firm). Also check that your discard is active enough—if it’s been sitting for months without feeding, the yeast population may be too low to create good rise.
Can I make this recipe without a kitchen scale?
You can, but I don’t recommend it. Flour measurement by volume is notoriously inconsistent—one cup can range from 120g to 150g depending on how you scoop. That 20% difference can make or break your focaccia. If you must use cups, spoon the flour into the cup and level it off without packing. But honestly, a $15 scale will transform your baking.
How do I know when the focaccia is fully baked?
Look for three signs: the top should be deep golden brown (not pale), the bottom should sound hollow when you tap it, and the internal temperature should reach 200°F on an instant-read thermometer. If you’re unsure, it’s better to bake an extra 2-3 minutes than to underbake. Underbaked focaccia will be gummy in the center.
Can I add toppings like olives or cherry tomatoes?
Absolutely. Press them into the dimpled dough before baking. Just make sure to pat them dry first—excess moisture can create soggy spots. Cherry tomatoes should be halved and placed cut-side up. Olives work best if they’re pitted and halved. Go easy on wet toppings; too many can weigh down the dough and prevent proper rising.
Pin This Recipe!
Best Easy Sourdough Discard Focaccia with Rosemary

This sourdough discard focaccia is crispy on the bottom, airy in the middle, and golden on top, with a tangy flavor from an overnight cold fermentation. It’s a forgiving, beginner-friendly bread that uses simple ingredients and minimal active work.
- Prep Time: 15 minutes
- Cook Time: 30 minutes
- Total Time: 13-25 hours (includes 12-24 hours cold ferment and 2-4 hours final proof)
- Yield: 12 servings 1x
- Category: Bread
- Cuisine: Italian
Ingredients
- 500g all-purpose flour (about 4 cups)
- 200g sourdough discard (about 1 cup)
- 350g warm water (about 1.5 cups, around 85°F)
- 60g olive oil (about 1/4 cup), plus 2-3 tablespoons for pan and topping
- 10g fine sea salt (about 1.5 teaspoons)
- 2 tablespoons fresh rosemary, finely chopped
- Flaky sea salt for topping (optional)
Instructions
- Mix the dough: In a large bowl, combine warm water and sourdough discard. Stir until mostly dissolved. Add olive oil and salt, then add all the flour at once. Stir until no dry flour remains. Cover and let rest for 30 minutes (autolyse).
- Stretch and fold: Wet your hand slightly. Grab one side of the dough, stretch it up, and fold it over the center. Rotate the bowl 90 degrees and repeat for a full rotation. Cover and rest 30 minutes. Repeat two more times (3 rounds total).
- Cold ferment: Cover the bowl tightly with plastic wrap and refrigerate for 12-24 hours.
- Prepare the pan: Pour 2 tablespoons of olive oil into a 9×13-inch baking pan and spread it all over the bottom and sides.
- Transfer and stretch: Remove cold dough from the fridge. Scoop it into the oiled pan. Let it sit uncovered for 20 minutes. Using oiled fingertips, gently stretch the dough toward the corners. If it resists, let it rest another 10 minutes and try again.
- Final proof: Cover the pan loosely with plastic wrap or a kitchen towel. Let it rise at room temperature until puffy, bubbly, and nearly doubled in volume (2-4 hours).
- Dimple and top: Preheat oven to 425°F. Drizzle 1-2 tablespoons of olive oil over the dough. Using oiled fingertips, press deep dimples all over the surface. Sprinkle chopped rosemary and flaky sea salt evenly on top.
- Bake: Place the pan on the middle rack and bake for 25-30 minutes, until deep golden brown and the bottom is crispy. Internal temperature should reach 200°F.
- Cool: Let the focaccia cool in the pan for 5 minutes, then transfer to a wire rack. Cool for at least 10 minutes before serving.
Notes
Don’t skip the cold ferment—it develops flavor and open crumb. Use good-quality olive oil. Dimple with confidence, pressing all the way to the bottom of the pan. For best results, weigh ingredients. If using active starter instead of discard, reduce final proof by about 30 minutes.
Nutrition
- Serving Size: 1/12 of recipe
- Calories: 220
- Sodium: 380
- Fat: 8
- Saturated Fat: 1
- Carbohydrates: 32
- Fiber: 1
- Protein: 5
Keywords: sourdough discard, focaccia, rosemary, easy bread, beginner bread, sourdough recipe


