Introduction
It was 10:47 PM on a Wednesday, and honestly, I was staring at an empty Tupperware container, wondering how on earth I’d managed to forget prepping snacks for the next day’s school lunchboxes. No oats soaked overnight, no fancy granola bars hiding in the pantry—just a jar of peanut butter and a half-empty bag of chocolate chips. I didn’t have the time or energy for a full baking session, but I had a sudden spark: why not whip up something quick, no-bake, and peanut buttery? The late hour made me a little reckless, so I tossed in a few unexpected ingredients I usually reserve for breakfast, and let me tell you, those energy balls turned out to be a weirdly genius solution.
I remember getting a bit messy—peanut butter stuck on the counter, a rogue chocolate chip rolling off the table—and that little chaos felt oddly comforting. Maybe you’ve been there, the frantic scramble to put together a snack that’s both kid-friendly and quick. These Quick No-Bake Peanut Butter Energy Balls for School Lunchboxes have since become my go-to secret weapon. They’re simple, fast, and somehow hit that perfect sweet-and-nutty note that keeps everyone coming back for more. Honestly, it’s the kind of recipe that sneaks into your routine and never lets go.
Why You’ll Love This Recipe
This recipe has been put through the wringer by busy parents, teachers, and snack enthusiasts alike. I’ve tested it on hectic mornings, lazy afternoons, and even impromptu road trips—and it always delivers. Here’s why these Quick No-Bake Peanut Butter Energy Balls are a winner:
- Quick & Easy: Ready in under 15 minutes, no baking required—perfect for those last-minute lunchbox moments.
- Simple Ingredients: Uses pantry staples you probably already have, no need to hunt down anything fancy.
- Perfect for School Lunchboxes: Bite-sized, mess-free, and kid-approved for mid-day energy boosts.
- Crowd-Pleaser: Gets rave reviews from both kids and adults, making snack time something to look forward to.
- Unbelievably Delicious: The creamy peanut butter combined with chewy oats and a hint of chocolate creates a flavor and texture combo that’s pure comfort.
What sets this recipe apart isn’t just the speed or ease—it’s the subtle balance of flavors and textures. I like to fold in a pinch of sea salt or a splash of vanilla extract for a nuanced twist that makes these balls feel homemade and special. Plus, the no-bake method means you don’t need to heat up your kitchen, which, trust me, is a blessing during busy school weeks.
So whether you’re looking to surprise the kids with a wholesome snack or need a quick treat to grab on the go, these energy balls have got your back.
What Ingredients You Will Need
This recipe uses simple, wholesome ingredients to deliver bold flavor and satisfying texture without the fuss. Most are pantry staples, and you can easily swap a few to fit your preferences or dietary needs.
- Rolled oats (1 ½ cups / 135 grams) – The chewy base that gives structure and fiber. I recommend old-fashioned oats for the best texture.
- Natural creamy peanut butter (¾ cup / 190 grams) – Adds richness and protein. I personally prefer Smucker’s Natural or Justin’s for their smoothness and flavor.
- Honey (⅓ cup / 113 grams) – Acts as a natural sweetener and binder. Substitute with maple syrup for a vegan option.
- Mini chocolate chips (⅓ cup / 60 grams) – For a touch of melty sweetness. Use dairy-free chips if needed.
- Ground flaxseed (2 tablespoons) – Adds a nutty flavor and boosts fiber and omega-3s.
- Vanilla extract (1 teaspoon) – Enhances overall flavor with a warm note.
- Sea salt (a pinch) – Balances sweetness and brightens flavors.
Optional add-ins:
- Chopped nuts (¼ cup / 30 grams) – For extra crunch.
- Shredded coconut (2 tablespoons) – Adds a tropical twist.
- Protein powder (¼ cup / 30 grams) – To boost protein content for active kids.
All these ingredients come together into a no-fuss mix that feels both nourishing and indulgent, making them ideal for school lunchboxes or quick snacks.
Equipment Needed

- Mixing bowl: A medium to large bowl for combining ingredients. I use a glass bowl because it’s easy to clean and doesn’t hold odors.
- Measuring cups and spoons: For accuracy—especially important with sticky ingredients like honey and peanut butter.
- Spoon or spatula: To stir and combine everything thoroughly.
- Baking sheet or plate: For placing formed energy balls before chilling.
- Plastic wrap or airtight container: To store the energy balls once ready.
If you don’t have a baking sheet, a large plate works just fine. For mixing, a hand mixer isn’t necessary—this is a job for good old-fashioned elbow grease. I find that hand-rolling each ball gives a satisfying rhythm to the process, though you can speed things up with a small cookie scoop.
Preparation Method
- Gather your ingredients: Measure out 1 ½ cups (135 grams) rolled oats, ¾ cup (190 grams) creamy peanut butter, ⅓ cup (113 grams) honey, ⅓ cup (60 grams) mini chocolate chips, 2 tablespoons ground flaxseed, 1 teaspoon vanilla extract, and a pinch of sea salt.
- Mix wet ingredients: In a medium bowl, combine the peanut butter, honey, and vanilla extract. Stir until the mixture is smooth and well blended. This should take about 2-3 minutes. If your peanut butter is a bit stiff, warming it slightly (10 seconds in the microwave) helps.
- Add dry ingredients: Stir in the rolled oats, ground flaxseed, and sea salt until everything is evenly incorporated. The mixture should be sticky but firm enough to hold shape. If it feels too dry, add a teaspoon of honey or a splash of water; too wet, add a few more oats.
- Fold in chocolate chips: Gently mix in the mini chocolate chips. Resist the urge to overmix as you want those chips intact and not melted.
- Form the balls: Using your hands or a small cookie scoop, roll the mixture into 1-inch (2.5 cm) balls. This recipe should yield about 18-20 balls. I usually get a little messy here, so a damp towel nearby is handy.
- Chill: Place the energy balls on a baking sheet or plate lined with parchment paper and refrigerate for at least 30 minutes. This step helps them firm up and keeps them from sticking together in the lunchbox.
- Store: Transfer the chilled balls to an airtight container. They keep well in the fridge for up to a week or can be frozen for up to 3 months.
Pro tip: If you’re short on time, you can skip the chill and eat them immediately, but they’ll be a bit softer. The chill also helps all the flavors meld together, making every bite more satisfying.
Cooking Tips & Techniques
Here are some tips I’ve picked up after many late-night peanut butter ball marathons that’ll make your process smoother:
- Mixing consistency: The key is to get the right balance between dry and wet ingredients. If the mixture crumbles, add a little more peanut butter or honey. If it’s too sticky, toss in extra oats.
- Use natural peanut butter: The kind with just peanuts (and maybe salt) gives the best flavor and texture. Avoid the super oily ones unless you stir well before measuring.
- Don’t overmix chocolate chips: Fold them gently to prevent melting or breaking up.
- Rolling technique: Lightly dampen your hands with water for easier rolling and less stickiness.
- Multitasking tip: While the balls chill, clean up your workspace or prep other lunchbox items.
- Storage advice: Keep the balls chilled to maintain shape and freshness, especially in warmer climates.
It took a couple of tries to find the perfect oat-to-peanut butter ratio that keeps these balls from falling apart but still feels creamy and indulgent. If you ever find them too dry or crumbly, don’t hesitate to add a little more honey or peanut butter as you go.
Variations & Adaptations
This recipe is a great base to tweak depending on your tastes or dietary needs. Here are some ideas I’ve tried or recommend:
- Nut-free version: Swap peanut butter with sunflower seed butter and ensure chocolate chips are nut-free.
- Boost protein: Add a scoop of your favorite protein powder or mix in some chopped nuts like almonds or walnuts.
- Flavor twists: Stir in cinnamon, pumpkin spice, or shredded coconut for seasonal flair.
- Superfood add-ins: Mix in chia seeds, hemp seeds, or dried fruit like cranberries for extra nutrition.
- Vegan option: Use maple syrup instead of honey and dairy-free chocolate chips.
Personally, I once added a teaspoon of espresso powder for a subtle mocha flavor—surprisingly delicious and a little pick-me-up for those long school days.
Serving & Storage Suggestions
Serve these energy balls chilled or at room temperature. They’re perfect for slipping straight into lunchboxes or packing for afternoon snacks. I like to pair them with a piece of fresh fruit or a small container of yogurt for a balanced mini-meal.
For storage, keep the balls in an airtight container in the fridge. They stay fresh for up to a week, which is great for prepping ahead. If you need to keep them longer, freeze them in a single layer on a tray before transferring to a freezer-safe bag—defrost for 10-15 minutes before serving.
Over time, the flavors meld beautifully, making them even tastier a day or two after you make them. The peanut butter and honey marry into this cozy, sweet, slightly salty bite that’s just right for busy school days.
Nutritional Information & Benefits
Each peanut butter energy ball contains approximately:
| Nutrient | Amount (per ball) |
|---|---|
| Calories | 110 kcal |
| Protein | 3.5 grams |
| Fat | 7 grams (mostly healthy fats) |
| Carbohydrates | 10 grams |
| Fiber | 2 grams |
| Sugar | 5 grams (natural sugars from honey and peanut butter) |
The combination of oats, peanut butter, and flaxseed provides a good mix of protein, fiber, and healthy fats to keep kids energized and satisfied. Plus, using natural sweeteners like honey keeps the sugar content moderate and more wholesome than processed snacks. This recipe is gluten-free if you use certified gluten-free oats and can be adapted to be vegan or nut-free as needed. Just be mindful of allergies when packing for school.
Conclusion
These Quick No-Bake Peanut Butter Energy Balls for School Lunchboxes are a lifesaver for busy parents and snackers alike. They’re fast, fuss-free, and packed with wholesome ingredients that actually taste great. I love how customizable they are—you can easily adjust flavors or nutrition to fit your family’s needs without breaking a sweat. Honestly, they’ve become my secret weapon for those chaotic mornings when I need a reliable snack that doesn’t require turning on the oven.
Give this recipe a try and see how it fits your routine—maybe you’ll find it as addictive as I do. I’d love to hear about your favorite variations or how you pack them in lunchboxes, so don’t hesitate to share your experiences in the comments below. Here’s to easy, tasty snacks that keep everyone happy and fueled!
FAQs
Can I make these energy balls ahead of time?
Absolutely! You can prepare them up to a week in advance and store them in the fridge. They also freeze well for up to 3 months.
Are these energy balls safe for kids with nut allergies?
Not with peanut butter, but you can swap in sunflower seed butter or soy nut butter to make a nut-free version.
What if I don’t have honey—can I use something else?
Yes, maple syrup works great as a vegan alternative and provides a similar sweetness and binding effect.
Can I add protein powder to boost nutrition?
Definitely! Just add about ¼ cup (30 grams) of your preferred protein powder to the dry ingredients for an extra protein kick.
How do I keep the energy balls from sticking together?
Store them chilled in an airtight container, ideally separated by parchment paper if stacking. Rolling them slightly firmer and chilling before storing also helps.
For a snack that’s just as quick and satisfying, you might enjoy my crispy garlic chicken recipe, which is perfect for busy weeknight dinners.
Pin This Recipe!
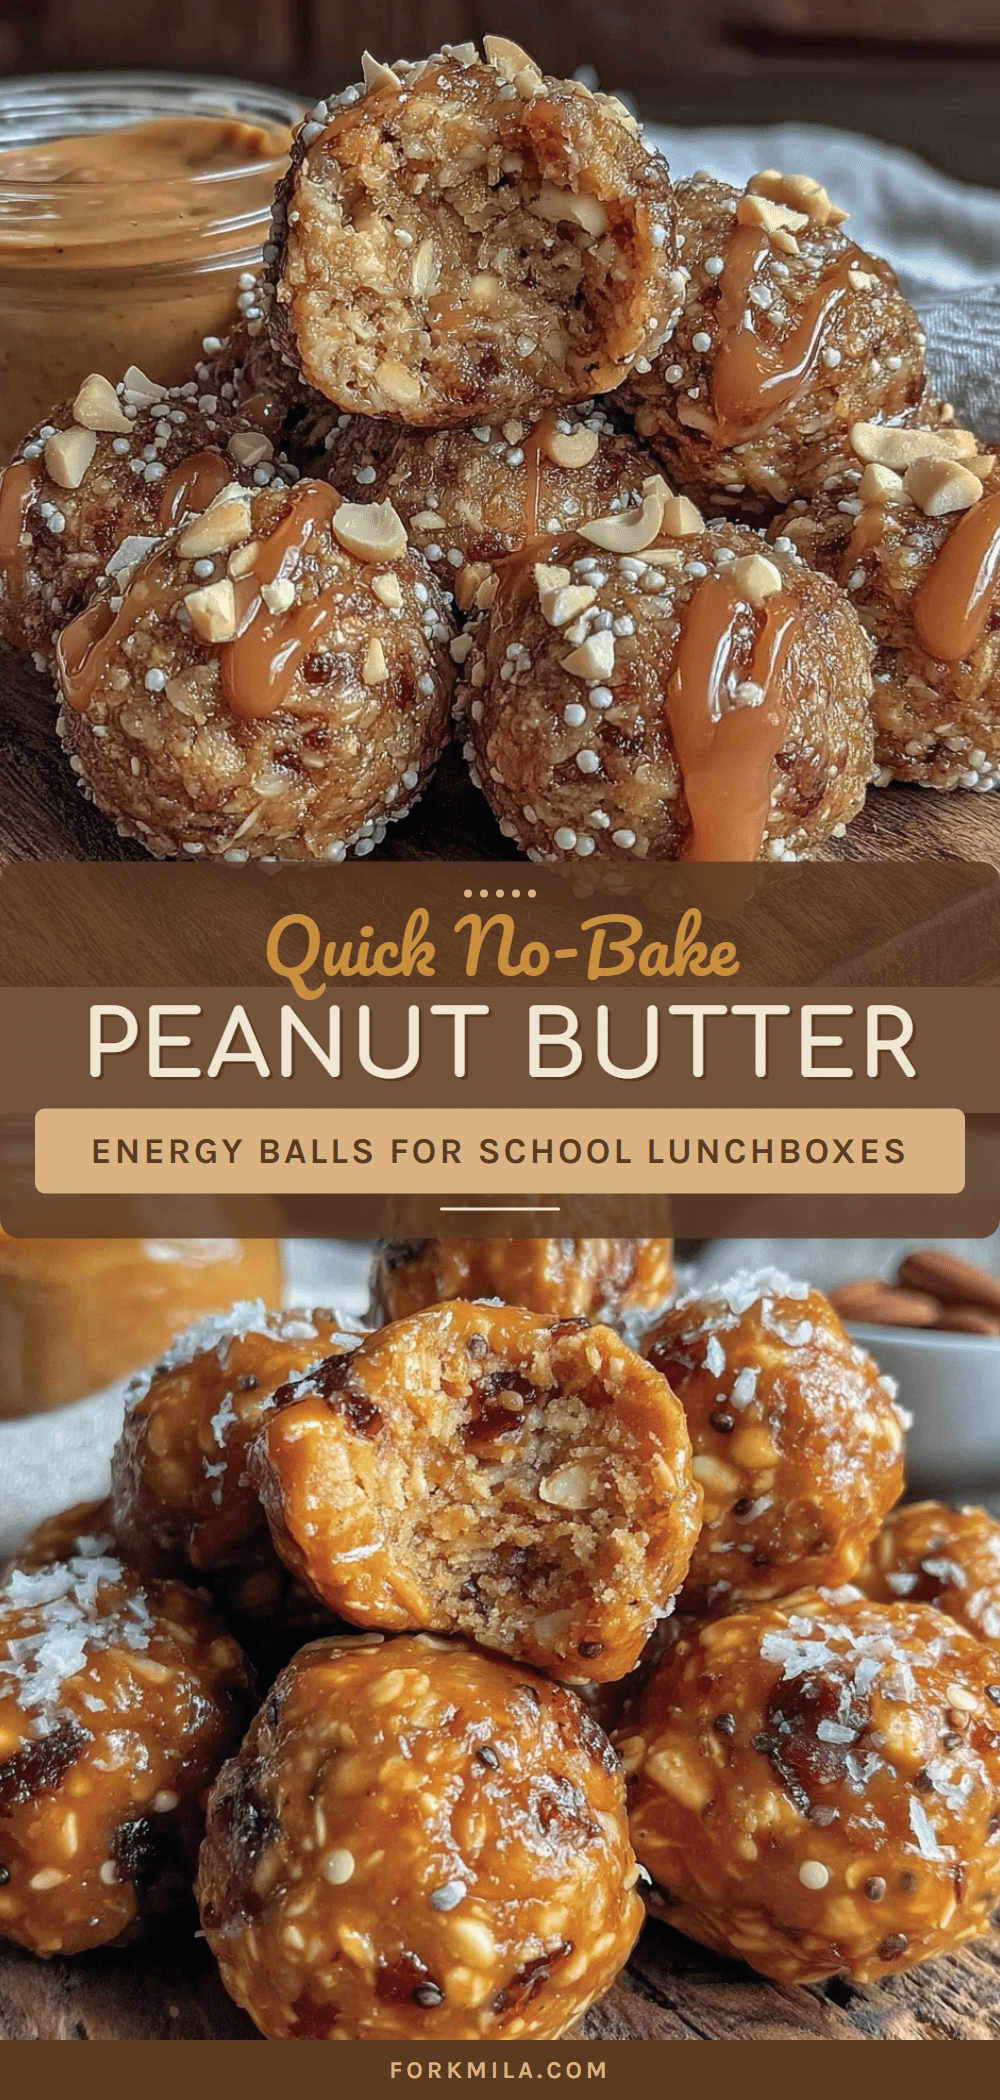
Quick No-Bake Peanut Butter Energy Balls Easy Recipe for School Lunchboxes

These no-bake peanut butter energy balls are a quick, easy, and kid-friendly snack perfect for school lunchboxes. Made with simple pantry staples, they offer a sweet and nutty flavor with a chewy texture.
- Prep Time: 10 minutes
- Cook Time: 0 minutes
- Total Time: 40 minutes
- Yield: 18-20 energy balls 1x
- Category: Snack
- Cuisine: American
Ingredients
- 1 ½ cups (135 grams) rolled oats
- ¾ cup (190 grams) natural creamy peanut butter
- ⅓ cup (113 grams) honey (or maple syrup for vegan option)
- ⅓ cup (60 grams) mini chocolate chips
- 2 tablespoons ground flaxseed
- 1 teaspoon vanilla extract
- A pinch of sea salt
- Optional: ¼ cup (30 grams) chopped nuts
- Optional: 2 tablespoons shredded coconut
- Optional: ¼ cup (30 grams) protein powder
Instructions
- Measure out 1 ½ cups (135 grams) rolled oats, ¾ cup (190 grams) creamy peanut butter, ⅓ cup (113 grams) honey, ⅓ cup (60 grams) mini chocolate chips, 2 tablespoons ground flaxseed, 1 teaspoon vanilla extract, and a pinch of sea salt.
- In a medium bowl, combine the peanut butter, honey, and vanilla extract. Stir until smooth and well blended, about 2-3 minutes. Warm peanut butter slightly if stiff.
- Stir in the rolled oats, ground flaxseed, and sea salt until evenly incorporated. Adjust consistency by adding honey or water if too dry, or oats if too wet.
- Gently fold in the mini chocolate chips, being careful not to overmix.
- Roll the mixture into 1-inch (2.5 cm) balls using hands or a small cookie scoop, yielding about 18-20 balls.
- Place the balls on a baking sheet or plate lined with parchment paper and refrigerate for at least 30 minutes to firm up.
- Transfer chilled balls to an airtight container. Store in the fridge for up to a week or freeze for up to 3 months.
Notes
If mixture is too dry, add more honey or peanut butter; if too sticky, add more oats. Lightly dampen hands with water for easier rolling. Chill for at least 30 minutes for best texture and flavor melding. Can be stored in fridge up to a week or frozen up to 3 months.
Nutrition
- Serving Size: 1 energy ball
- Calories: 110
- Sugar: 5
- Fat: 7
- Carbohydrates: 10
- Fiber: 2
- Protein: 3.5
Keywords: no-bake, peanut butter, energy balls, school lunchbox, quick snack, healthy snack, kid-friendly, no bake snack