My neighbor wasn’t trying to impress anyone. I’d stopped by to borrow a ladder on a crisp October afternoon, and the smell of dark chocolate hit me before I even made it past her screen door. It was that deep, almost smoky cocoa scent—the kind that makes you stop mid-sentence and just breathe in. She was standing at her kitchen counter, piping what looked like delicate strands of a web onto a batch of the most perfect, crackly chocolate cookies I’d ever seen. “Oh, these?” she said, barely looking up, “just something for my kid’s class party.” Just something. Honestly, I think I stood there for a full minute, ladder completely forgotten, watching her work. She wasn’t fussing or stressing—just moving with this easy rhythm, like creating edible art was no big deal. Maybe you’ve been there, where you witness someone do something casually brilliant and you immediately know you’re going to have to recreate it yourself. That’s exactly how these spider web chocolate cookies came into my life. I begged her for the basics of the method, went home, and spent the next two evenings getting my royal icing to cooperate. The result? A cookie that’s rich, fudgy, and just a little bit spooky. Perfect for Halloween, but honestly, I’ve been making them all year round. That’s how good they are.
Why You’ll Love This Recipe
Let me tell you why these cookies have become my most-requested Halloween treat. First off, they taste incredible. The cookie base is deeply chocolatey with a soft, brownie-like center and those signature crinkly tops. It’s the kind of cookie that makes you close your eyes after the first bite.
But here’s the real magic. The spider web design looks complicated, but it’s actually one of the easiest decorating techniques I’ve ever learned. You don’t need a steady hand or any artistic talent. I mean it. If you can draw a few circles and drag a toothpick through icing, you can make these look like they came from a bakery.
- Quick & Easy: The dough comes together in about 15 minutes, and the decorating takes less than 5 minutes per batch of cookies.
- Simple Ingredients: You probably already have cocoa powder, butter, sugar, and eggs in your kitchen. No fancy specialty items needed.
- Perfect for Halloween: These are the star of any Halloween party, classroom celebration, or spooky movie night.
- Crowd-Pleaser: Kids and adults both go crazy for them. The chocolate is rich enough for grown-ups, but the design is fun enough for little ones.
- Unbelievably Delicious: The texture is this perfect balance—crispy edges, soft centers, and a glossy royal icing web that adds just the right amount of sweetness.
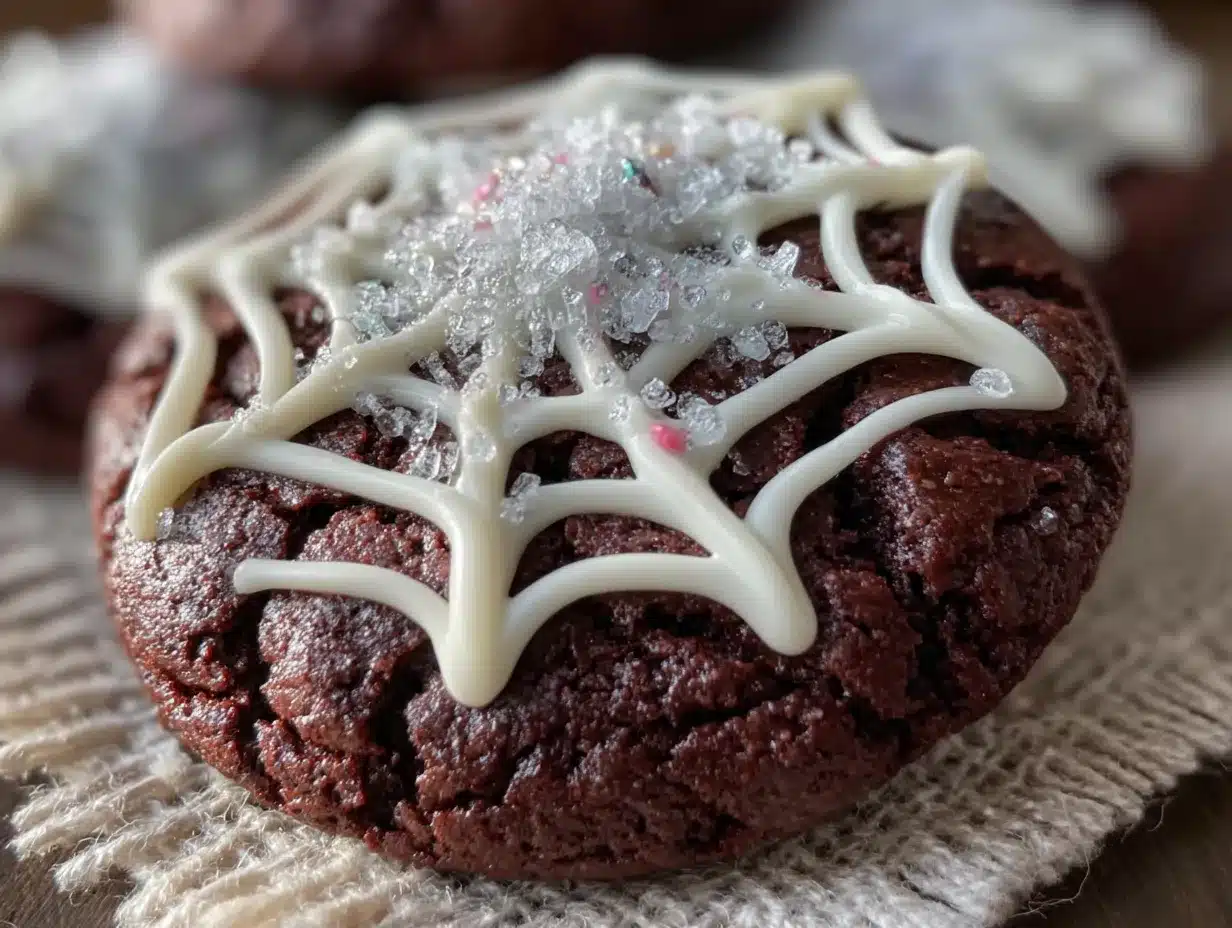
What makes these different from every other decorated cookie out there is the technique. Instead of flooding the whole cookie with icing and then piping a web on top, you pipe concentric circles of white royal icing onto a dark chocolate cookie, then drag a toothpick through to create the web effect. It’s clever, it’s fast, and it looks spectacular. This isn’t just another Halloween cookie recipe—it’s the one that will have everyone asking for the recipe.
What Ingredients You Will Need
This recipe uses simple, pantry-friendly ingredients to create cookies that taste anything but ordinary. The key is using good-quality cocoa powder and making sure your butter and eggs are at room temperature for the best texture.
For the Chocolate Cookies
- Unsalted butter, softened (1 cup / 226g) – I always use unsalted so I can control the salt level. Let it sit out for about 30 minutes before starting.
- Granulated sugar (1 cup / 200g) – Regular white sugar gives these cookies their signature crinkly top.
- Light brown sugar, packed (1/2 cup / 100g) – Adds moisture and a hint of molasses flavor that deepens the chocolate.
- Large eggs (2, room temperature) – Room temperature eggs incorporate more easily into the creamed butter, giving you a smoother dough.
- Vanilla extract (2 teaspoons) – Pure vanilla makes a difference here. I recommend Nielsen-Massey for the best flavor.
- All-purpose flour (2 cups / 240g) – Spoon and level your flour for the most accurate measurement.
- Unsweetened cocoa powder (3/4 cup / 75g) – I prefer Ghirardelli or Hershey’s Special Dark for a rich, deep chocolate flavor.
- Baking soda (1 teaspoon) – Helps the cookies spread just the right amount.
- Salt (1/2 teaspoon) – Balances the sweetness and enhances the chocolate.
- Powdered sugar (1/4 cup / 30g, for rolling) – This is what gives the cookies that beautiful crackled look.
For the Royal Icing Spider Webs
- Powdered sugar (2 cups / 240g) – Sift it first to avoid lumpy icing.
- Meringue powder (2 tablespoons) – This gives the royal icing its structure and glossy finish. You can find it at most craft stores or online.
- Water (3-4 tablespoons) – Add slowly. The consistency should be thick enough to hold its shape but thin enough to pipe smoothly.
- Vanilla extract (1/2 teaspoon) – Optional, but adds a nice flavor.
- Black gel food coloring (optional) – Some people like to add a tiny drop to the chocolate cookie dough for an even darker, spookier look.
If you don’t have meringue powder, you can substitute it with 2 large egg whites and skip the water. Just be aware that cookies decorated with egg-white-based royal icing aren’t safe for anyone with egg allergies.
Equipment Needed
You don’t need a ton of fancy equipment for these spider web cookies, which is one of the reasons I love making them. Here’s what you’ll need:
- Electric stand mixer or hand mixer – Creaming the butter and sugars by hand is possible, but your arm will thank you for using a mixer.
- Large mixing bowls – One for the wet ingredients, one for the dry.
- Baking sheets (2) – Line them with parchment paper or silicone baking mats for easy cleanup.
- Cookie scoop or tablespoon – For uniform cookie sizes. I use a 1.5-tablespoon scoop.
- Piping bags or zip-top bags – For the royal icing. If you don’t have piping bags, a small zip-top bag with the corner snipped off works perfectly.
- Toothpicks – The most important tool! This is what creates the spider web effect.
- Cooling rack – Cookies need to cool completely before decorating.
I’ve made these cookies using a cheap hand mixer I bought for $15, and they turned out just as good as when I use my KitchenAid. Don’t stress about having the perfect equipment. A whisk and a strong arm can get the job done too.
Preparation Method
Alright, let’s get to the fun part. I’m going to walk you through every step so your cookies turn out perfectly spooky.
Step 1: Make the Cookie Dough
In your large mixing bowl, cream together the softened butter, granulated sugar, and brown sugar. Beat on medium speed for about 3 minutes until the mixture is light and fluffy. You’ll notice it gets paler in color and the texture becomes almost grainy. Scrape down the sides of the bowl once during this process.
Add the eggs one at a time, beating well after each addition. Then add the vanilla extract and mix until combined. The mixture might look a little curdled at this point—that’s totally normal, don’t panic.
In a separate bowl, whisk together the flour, cocoa powder, baking soda, and salt. I like to use a fork for this to make sure everything is evenly distributed. Gradually add the dry ingredients to the wet ingredients, mixing on low speed until just combined. You want to stop as soon as you don’t see any more streaks of flour. Overmixing will make your cookies tough.
Step 2: Chill the Dough
Cover the bowl with plastic wrap and refrigerate for at least 30 minutes. This step is non-negotiable. Chilling the dough prevents the cookies from spreading too much in the oven and gives them that perfect thick, fudgy texture. I’ve skipped this step before, and let me tell you, I ended up with flat, sad pancakes instead of cookies. Learn from my mistake.
Step 3: Shape and Roll
Preheat your oven to 350°F (175°C). Line your baking sheets with parchment paper.
Scoop out tablespoon-sized portions of dough and roll them into balls. Here’s the trick: roll each ball in powdered sugar until it’s completely coated. Don’t be shy with the sugar—this is what creates those beautiful crinkly cracks on top. Place the sugar-coated dough balls about 2 inches apart on the prepared baking sheets.
Step 4: Bake
Bake for 10-12 minutes. The cookies will look puffy and slightly underdone in the center when you take them out—that’s exactly what you want. They’ll continue to set as they cool on the baking sheet. Let them rest on the sheet for 5 minutes, then transfer to a cooling rack to cool completely. Don’t even think about decorating them until they’re fully cool, or your royal icing will melt right off.
Step 5: Make the Royal Icing
While the cookies are cooling, make the icing. In a medium bowl, whisk together the powdered sugar and meringue powder. Add 3 tablespoons of water and the vanilla extract, and whisk until smooth. The icing should be thick but still pipeable. If it’s too thick, add the remaining tablespoon of water, one teaspoon at a time. If it’s too thin, add a little more powdered sugar.
Transfer the icing to your piping bag or zip-top bag. Snip off a very tiny tip—you want a thin line for the spider web.
Step 6: Decorate the Spider Webs
Here’s where the magic happens. Take a cooled cookie and pipe a small dot of royal icing in the center. Then pipe 2-3 concentric circles around that dot, getting progressively larger. Don’t worry about making them perfect—spider webs are naturally a little irregular.
Immediately take a toothpick and drag it from the center dot outward through all the circles, like you’re drawing the spokes of a wheel. Do this in 5-6 places around the cookie. Then, drag the toothpick in the opposite direction, from the outer edge back toward the center, in between each spoke. This creates the classic web pattern. Wipe the toothpick clean between each cookie.
Let the icing set for at least 1 hour before serving or stacking.
Cooking Tips & Techniques
I’ve made these spider web cookies more times than I can count, and I’ve definitely learned a few things the hard way. Here are my best tips for success.
Don’t overbake. This is the most important tip I can give you. When those cookies come out of the oven, they should look slightly puffy and soft in the middle. They’ll continue to bake on the hot baking sheet as they cool. If you wait until they look “done” in the oven, you’ll end up with dry, hard cookies.
Use a light hand with the powdered sugar. When you roll the dough balls, you want a generous coating, but you don’t want to press the sugar into the dough. Just gently roll until the ball is covered, then place it on the baking sheet.
Work quickly with the royal icing. Royal icing starts to set and form a skin within a few minutes. Once you pipe the circles, you need to drag the toothpick through immediately. If you wait too long, the icing will be too firm to create the web effect, and you’ll just end up with a messy blob. Trust me, I’ve been there.
Keep the icing covered. Royal icing dries out fast. If you’re not using it, keep the bowl covered with a damp paper towel or plastic wrap. Otherwise, you’ll end up with hard, unusable icing halfway through decorating.
Practice on a piece of parchment paper first. If you’re nervous about the decorating, pipe a few practice webs on parchment paper before you start on the cookies. It takes the pressure off and helps you get the hang of the technique.
Variations & Adaptations
One of the best things about this recipe is how adaptable it is. Here are some of my favorite variations.
Gluten-Free Version: Substitute the all-purpose flour with a 1:1 gluten-free baking flour blend. I’ve used Bob’s Red Mill with great results. The texture will be slightly more delicate, so handle the dough gently.
Vegan Option: Use vegan butter and a flax egg (1 tablespoon ground flaxseed mixed with 3 tablespoons water, let sit for 5 minutes). For the royal icing, use aquafaba (the liquid from a can of chickpeas) instead of meringue powder. Whisk 3 tablespoons of aquafaba with the powdered sugar until stiff peaks form.
Different Web Colors: Instead of white royal icing, try using orange, green, or purple gel food coloring for a different Halloween vibe. You could also pipe a tiny black spider in the center of each web for an extra spooky touch.
Spice It Up: Add 1/2 teaspoon of cinnamon and a pinch of cayenne pepper to the cookie dough for a Mexican hot chocolate twist. The warmth of the spices pairs beautifully with the dark chocolate.
Mint Chocolate Version: Add 1/2 teaspoon of peppermint extract to the cookie dough and use green royal icing for the webs. It tastes like a thin mint cookie in spider web form.
Serving & Storage Suggestions
These spider web cookies are best served at room temperature. The royal icing should be completely set before serving—give it at least an hour, but overnight is even better.
For a Halloween party, arrange them on a platter with some fake spider rings or plastic spiders scattered around for effect. They also look amazing on a tiered stand with other Halloween treats like candy corn rice krispie treats and pumpkin-shaped sugar cookies.
Storage is simple. Place the decorated cookies in an airtight container, layering them between sheets of parchment paper. They’ll stay fresh at room temperature for up to 5 days. Don’t refrigerate them—the cookies will dry out faster, and the royal icing can get sticky from the humidity.
You can also freeze the undecorated cookies for up to 3 months. Just bake and cool them completely, then freeze in a single layer on a baking sheet. Once frozen, transfer to a freezer-safe bag. When you’re ready to serve, thaw them at room temperature and then decorate. The royal icing should be added fresh for the best appearance.
One thing I love about these cookies is that the flavors actually get better after a day or two. The chocolate deepens and the cookie softens slightly, becoming even more fudgy. So don’t stress about making them at the last minute—they’re actually better if you bake them a day ahead.
Nutritional Information & Benefits
Let’s be real—these are a treat, not a health food. But I do think it’s worth knowing what’s in them. Here’s the approximate nutritional breakdown per cookie (based on 24 cookies):
- Calories: 185
- Fat: 9g
- Carbohydrates: 26g
- Protein: 3g
- Sugar: 17g
- Fiber: 1g
On the plus side, dark chocolate contains antioxidants called flavonoids, which can help support heart health. Cocoa is also rich in iron, magnesium, and zinc. So while I wouldn’t call these cookies healthy, they do have some redeeming qualities.
If you’re watching your sugar intake, you can reduce the sugar in the cookie dough by 1/4 cup without affecting the texture too much. The royal icing is harder to reduce since the sugar provides the structure, but you can use a sugar-free powdered sugar substitute if needed.
These cookies are not suitable for people with egg or dairy allergies, though the vegan version I mentioned earlier works beautifully. They also contain gluten, so stick to the gluten-free variation if needed.
Conclusion
These spider web chocolate cookies are everything I want in a Halloween treat. They’re rich, chocolatey, and just the right amount of spooky. The decorating technique looks impressive but is so simple that even my five-year-old nephew can do it (and he did, with great enthusiasm and a lot of toothpicks).
I love that this recipe lets you be creative without requiring any special skills. Whether you make perfect, symmetrical webs or wild, abstract ones, each cookie ends up looking unique and beautiful in its own way. That’s the magic of homemade treats—they don’t have to be perfect to be wonderful.
I’d love to see how your spider webs turn out! Leave a comment below and let me know if you tried any fun variations. Did you add a little spider to the center? Use orange icing instead of white? I’m always looking for new ideas to try. And if you’re looking for more Halloween baking inspiration, don’t miss my pumpkin snickerdoodles—they’re another fall favorite in my house.
Happy baking, and have a wonderfully spooky Halloween!
Frequently Asked Questions
Can I use store-bought royal icing instead of making my own?
You can, but I don’t recommend it. Store-bought royal icing is usually too thin for this technique and won’t hold the web pattern as well. Homemade royal icing with meringue powder is much more stable and gives you a cleaner result.
Why did my cookies spread too much?
This usually happens for one of two reasons: either the dough wasn’t chilled long enough, or the butter was too soft when you started. Make sure your butter is softened but still cool to the touch, and don’t skip the 30-minute chill time in the fridge.
Can I use a different type of icing for the spider webs?
Royal icing works best because it sets hard and creates clean lines. You could try using melted white chocolate or candy melts, but the consistency is trickier to manage. If you use candy melts, thin them with a little coconut oil before piping.
How far in advance can I make these cookies?
You can bake the cookies up to 3 days ahead and store them in an airtight container at room temperature. Decorate them the day you plan to serve them for the freshest look. The royal icing needs about 1-2 hours to set completely.
My royal icing is too thick/thin. How do I fix it?
If it’s too thick, add water one teaspoon at a time until it reaches a pipeable consistency. If it’s too thin, whisk in a little more powdered sugar. The ideal texture is thick enough to hold a peak but soft enough to pipe smoothly through a small tip.
Pin This Recipe!

Best Spider Web Chocolate Cookies – Easy Halloween Recipe

Rich, fudgy chocolate cookies decorated with a simple royal icing spider web design. This easy Halloween treat looks impressive but requires no artistic talent.
- Prep Time: 15 minutes
- Cook Time: 12 minutes
- Total Time: 1 hour 27 minutes (includes chilling and setting)
- Yield: 24 cookies 1x
- Category: Dessert
- Cuisine: American
Ingredients
- 1 cup (226g) unsalted butter, softened
- 1 cup (200g) granulated sugar
- 1/2 cup (100g) light brown sugar, packed
- 2 large eggs, room temperature
- 2 teaspoons vanilla extract
- 2 cups (240g) all-purpose flour
- 3/4 cup (75g) unsweetened cocoa powder
- 1 teaspoon baking soda
- 1/2 teaspoon salt
- 1/4 cup (30g) powdered sugar (for rolling)
- 2 cups (240g) powdered sugar (for royal icing)
- 2 tablespoons meringue powder
- 3–4 tablespoons water
- 1/2 teaspoon vanilla extract (optional, for royal icing)
- Black gel food coloring (optional)
Instructions
- In a large mixing bowl, cream together the softened butter, granulated sugar, and brown sugar on medium speed for about 3 minutes until light and fluffy. Scrape down the sides once.
- Add the eggs one at a time, beating well after each addition. Add the vanilla extract and mix until combined.
- In a separate bowl, whisk together the flour, cocoa powder, baking soda, and salt. Gradually add the dry ingredients to the wet ingredients, mixing on low speed until just combined.
- Cover the bowl with plastic wrap and refrigerate for at least 30 minutes.
- Preheat oven to 350°F (175°C). Line baking sheets with parchment paper.
- Scoop tablespoon-sized portions of dough and roll into balls. Roll each ball in powdered sugar until completely coated. Place 2 inches apart on prepared baking sheets.
- Bake for 10-12 minutes. Cookies will look puffy and slightly underdone in the center. Let rest on the baking sheet for 5 minutes, then transfer to a cooling rack to cool completely.
- For the royal icing: In a medium bowl, whisk together powdered sugar and meringue powder. Add 3 tablespoons water and vanilla extract, whisk until smooth. Add more water if needed (1 teaspoon at a time) until thick but pipeable.
- Transfer icing to a piping bag or zip-top bag with a tiny tip snipped off.
- Pipe a small dot of royal icing in the center of each cooled cookie. Pipe 2-3 concentric circles around the dot, getting progressively larger.
- Immediately drag a toothpick from the center dot outward through all the circles in 5-6 places (like spokes of a wheel). Then drag the toothpick from the outer edge back toward the center between each spoke. Wipe toothpick clean between cookies.
- Let icing set for at least 1 hour before serving or stacking.
Notes
Chill the dough for at least 30 minutes to prevent spreading. Do not overbake; cookies should look slightly underdone in the center. Work quickly with royal icing as it sets fast. Keep icing covered with a damp paper towel when not in use. Practice on parchment paper first if nervous about decorating.
Nutrition
- Serving Size: 1 cookie
- Calories: 185
- Sugar: 17
- Sodium: 120
- Fat: 9
- Saturated Fat: 5
- Carbohydrates: 26
- Fiber: 1
- Protein: 3
Keywords: spider web cookies, chocolate cookies, Halloween cookies, royal icing, easy Halloween recipe, fudgy chocolate cookies


