My neighbor Carol wasn’t trying to impress anyone. I’d stopped by to borrow a whisk—mine had mysteriously vanished into the black hole of my kitchen drawers—and the smell hit me before I even got past her front door. Ginger, cinnamon, something warm and brown sugary. It was late October, leaves were piling up on her porch, and she just shrugged when I asked what she was baking. “Oh, just some bars. Got extra cream cheese.” Like it was nothing. Like she hadn’t just created the exact thing I wanted to eat for the rest of fall.
I stood there in her kitchen, whisk forgotten, watching her pull this pan of golden bars with a crinkly, spiced top out of the oven. She didn’t even dust them with powdered sugar—just set the pan on a cooling rack and offered me a fork. That first bite, honest to goodness, stopped me mid-sentence. The gingersnap crust had this deep, almost molasses-y snap to it, and the cheesecake layer was so creamy it practically melted. There was even a little ribbon of something dark running through it—she’d swirled in some salted caramel she had leftover from another project. I mean, who does that? Just has salted caramel hanging around on a Tuesday?
I practically begged her for the recipe, and she texted it to me later that night with the note: “It’s really nothing special.” But it is. Maybe you’ve been there, where you taste something so simple and perfect that you immediately start planning when you’ll make it yourself. That was me, standing in Carol’s kitchen, already mentally clearing my Sunday afternoon. These cozy fall cheesecake bars with gingersnap crust have become my go-to for everything from Thanksgiving dessert to “it’s raining and I need a reason to turn on the oven.” They’re the kind of recipe that feels fancy but is secretly low-effort, and I’ve been making them nonstop ever since.
Why You’ll Love This Recipe
Let me tell you why these cozy fall cheesecake bars have earned a permanent spot in my baking rotation. I’ve tested this recipe at least seven times—once with store-bought gingersnaps, once with homemade, once when I accidentally used low-fat cream cheese (don’t do it, seriously). Each batch taught me something, and what I’m sharing with you is the version that works every single time.
- Quick & Easy : The whole thing comes together in about 30 minutes of active prep. No water bath, no fussy techniques. Just mix, press, pour, and bake. Perfect for when you want something impressive without spending all day in the kitchen.
- Simple Ingredients : Cream cheese, gingersnap cookies, butter, sugar, eggs—all pantry staples. You might need to grab some sour cream, but that’s about it. No weird specialty items hiding in the back of your fridge.
- Perfect for Fall Gatherings : These bars scream autumn. They’re great for Friendsgiving, Halloween parties, or just a cozy night in with a mug of hot cider. The gingersnap crust alone is worth the price of admission.
- Crowd-Pleaser : I’ve brought these to three different gatherings and watched people go back for seconds every single time. Kids love them, adults love them, even my friend who “doesn’t really like cheesecake” asked for the recipe.
- Unbelievably Delicious : The contrast between the crunchy, spiced crust and the silky, tangy cheesecake filling is next-level. Add a drizzle of caramel on top and you’ve got something that tastes like it came from a fancy bakery.
What makes this recipe different from all the other cheesecake bar recipes out there? It’s the crust, honestly. Most recipes use graham crackers, which are fine, but gingersnaps bring this warm, spicy depth that pairs perfectly with the cream cheese. The molasses in the cookies complements the tanginess of the cheesecake in a way that feels intentional and special. Plus, I’ve nailed down the exact baking time and temperature to get that perfect creamy center without any cracking. No dry, overbaked edges here.
This is the kind of dessert that makes you close your eyes after the first bite. It’s comfort food reimagined—familiar enough to feel nostalgic, but different enough to feel exciting. Perfect for impressing guests without any stress, or turning a quiet fall evening into something memorable.
What Ingredients You Will Need
This recipe uses simple, wholesome ingredients to deliver bold fall flavor and that signature creamy texture. Most of these are probably already in your pantry or fridge, which makes these bars dangerously easy to whip up on a whim.
For the Gingersnap Crust:
- 2 cups (about 200g) gingersnap cookie crumbs (from about 8 ounces of cookies; I prefer Anna’s Ginger Thins or Nabisco Ginger Snaps for consistent texture)
- 1/4 cup (50g) granulated sugar
- 1/2 teaspoon ground cinnamon (adds warmth that complements the ginger)
- 1/4 teaspoon ground nutmeg (freshly grated if you have it)
- 6 tablespoons (85g) unsalted butter, melted (use salted butter and reduce the added salt if that’s all you have)
For the Cheesecake Filling:
- 16 ounces (450g) cream cheese, softened to room temperature (full-fat is crucial here—low-fat will make the filling watery)
- 3/4 cup (150g) granulated sugar
- 1/4 cup (60g) sour cream, room temperature (adds tanginess and ensures a silky texture)
- 2 teaspoons vanilla extract (pure vanilla extract makes a difference)
- 1 tablespoon fresh lemon juice (brightens the flavor and balances the sweetness)
- 1/4 teaspoon salt (enhances all the flavors)
- 2 large eggs, room temperature (cold eggs will seize the batter)
For the Caramel Swirl (Optional but Highly Recommended):
- 1/3 cup (80ml) store-bought or homemade salted caramel sauce (I use Trader Joe’s or make my own with this easy salted caramel sauce recipe)
Ingredient Selection Tips:
For the gingersnaps, look for cookies that are crisp, not soft. You want that snappy texture that will hold up when mixed with butter. If you can find them, the ones with visible molasses in the ingredient list tend to have the best flavor. For the cream cheese, Philadelphia brand is my go-to because it has the right fat content and stabilizers for baking. Let it sit on the counter for at least an hour before you start mixing—this is non-negotiable for a smooth filling.
Substitution Guidance:
- For a gluten-free version, use gluten-free gingersnap cookies (Pamela’s makes a good one) and ensure all other ingredients are certified gluten-free.
- If you don’t have sour cream, full-fat Greek yogurt works beautifully as a substitute.
- To make these dairy-free, use dairy-free cream cheese (like Kite Hill) and a plant-based butter alternative. The texture will be slightly different, but still delicious.
- No lemon juice? A splash of apple cider vinegar can provide a similar acidity to balance the sweetness.
Equipment Needed
You don’t need a ton of fancy equipment for these cozy fall cheesecake bars, which is part of their charm. Here’s what you’ll need:
- 9×9-inch baking pan : This is the perfect size for bars that are thick enough to feel substantial but cut cleanly. An 8×8 pan works too, but you’ll need to increase the baking time by 5-7 minutes.
- Food processor or zip-top bag and rolling pin : For crushing the gingersnaps into crumbs. I use my food processor because it’s faster, but if you’re in need of a little arm workout, the bag-and-rolling-pin method works great. Just make sure the crumbs are uniform—big chunks will make the crust crumbly.
- Electric hand mixer or stand mixer : For beating the cream cheese until smooth. A hand mixer is totally fine; you don’t need a stand mixer for this. Whisking by hand is possible but your arm will get tired, and you risk overworking the batter.
- Mixing bowls : One medium for the crust, one large for the filling.
- Parchment paper : Line your pan with parchment paper, leaving some overhang on two sides. This makes lifting the bars out after they’ve chilled so much easier. Trust me on this—I learned the hard way after mangling my first batch.
- Spatula : A rubber spatula for scraping down the bowl and spreading the filling evenly.
- Measuring cups and spoons : For accuracy, especially with the baking powder and spices.
If you don’t have a food processor, you can buy pre-crushed gingersnap crumbs at some stores, or just smash the cookies in a bag. I’ve done it both ways, and honestly, the bag method is kind of therapeutic. Just make sure you get all the air out before you start rolling!
Preparation Method
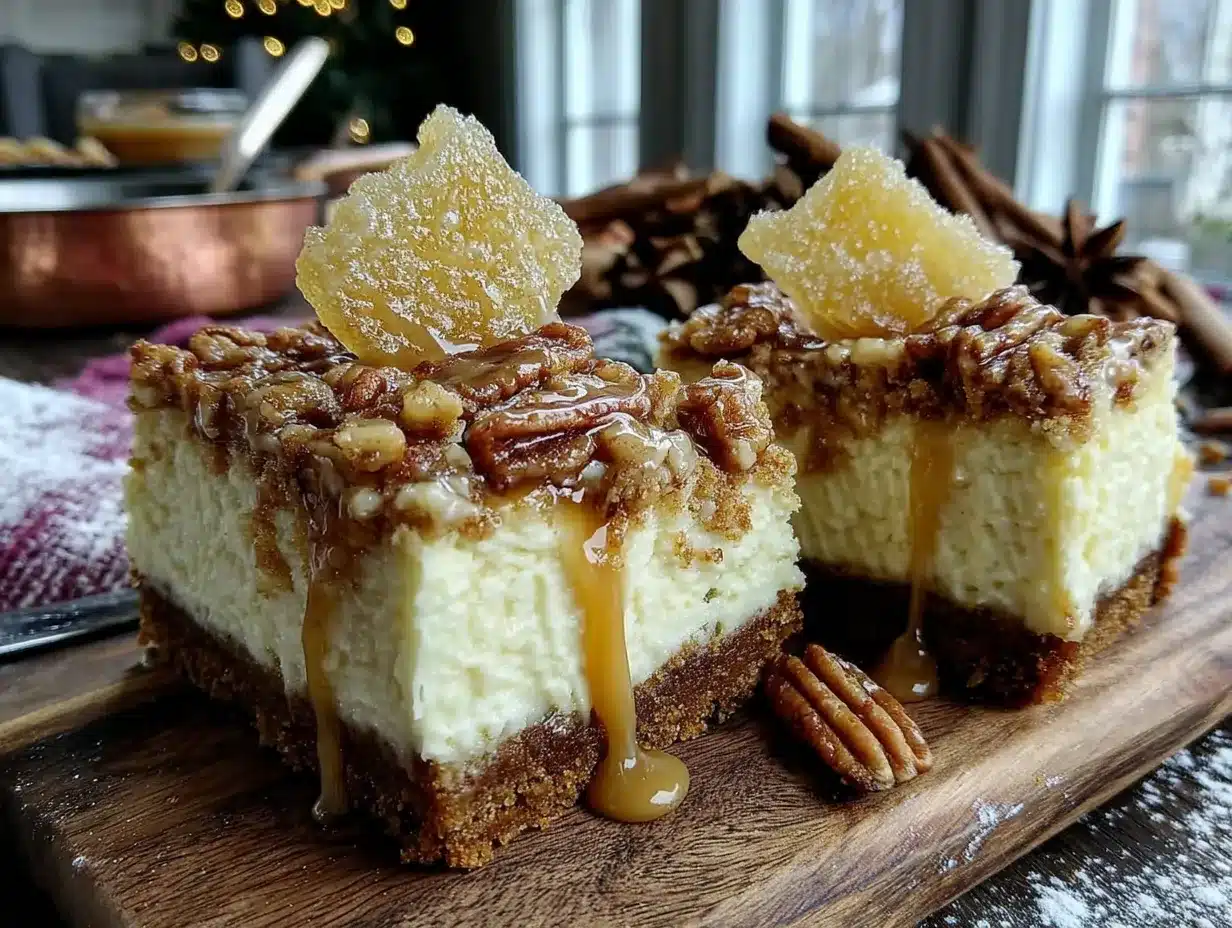
Let’s walk through this step by step. I’ll include all the little details I’ve learned from making these bars more times than I can count.
Step 1: Preheat and Prep the Pan (5 minutes)
Preheat your oven to 350°F (175°C). Line your 9×9-inch baking pan with parchment paper, leaving about 2 inches of overhang on two opposite sides. This creates handles for lifting the bars out later. Lightly spray the parchment with non-stick cooking spray, just to be safe.
Step 2: Make the Gingersnap Crust (10 minutes)
Place the gingersnap cookies in your food processor and pulse until you have fine, even crumbs. You should have about 2 cups. If you’re using the bag method, put the cookies in a sturdy zip-top bag, seal it, and crush them with a rolling pin until no large pieces remain. Transfer the crumbs to a medium bowl. Add the sugar, cinnamon, and nutmeg, and whisk to combine. Pour the melted butter over the crumb mixture and stir with a fork until every crumb is moistened. It should look like wet sand.
Step 3: Press the Crust into the Pan (5 minutes)
Transfer the crumb mixture to your prepared pan. Use the bottom of a measuring cup or a flat-bottomed glass to press the crumbs down firmly and evenly. Make sure you get the edges and corners—a loose crust will fall apart when you cut the bars. Press with authority! I like to use the bottom of a metal measuring cup because it’s heavy and gives nice, even pressure. Bake the crust for 10 minutes, then remove it from the oven and set it aside to cool slightly while you make the filling. Leave the oven on.
Step 4: Make the Cheesecake Filling (15 minutes)
In a large mixing bowl, beat the softened cream cheese with an electric hand mixer on medium speed until it’s completely smooth and creamy, about 2 minutes. Scrape down the sides and bottom of the bowl with your spatula. Add the sugar and beat for another minute until light and fluffy. Add the sour cream, vanilla extract, lemon juice, and salt, and beat on low until just combined. Scrape the bowl again.
Now, add the eggs one at a time, beating on low speed after each addition just until the yolk disappears into the batter. Do not overmix at this stage! Overbeating incorporates too much air, which can cause cracks during baking. The batter should be smooth, silky, and uniform in color. If you see any lumps, you haven’t let your cream cheese soften enough—but don’t panic, just keep beating on low until they disappear.
Step 5: Assemble the Bars (5 minutes)
Pour the cheesecake filling over the pre-baked crust. Use your spatula to spread it evenly to the edges. If you’re adding the caramel swirl, warm the caramel sauce slightly so it’s pourable (about 15 seconds in the microwave). Drop spoonfuls of caramel over the top of the filling, then use a knife or toothpick to swirl it gently into the cheesecake. Don’t over-swirl, or you’ll lose the distinct ribbons. A few figure-eight motions are all you need.
Step 6: Bake the Bars (40-45 minutes)
Place the pan in the preheated oven and bake for 40-45 minutes. The edges should look set and slightly puffed, but the center should still have a slight jiggle when you gently shake the pan. This is the sweet spot—overbaking will give you dry, cracked cheesecake. If the top starts browning too quickly after 30 minutes, tent the pan loosely with aluminum foil.
Step 7: Cool and Chill (4 hours minimum)
Remove the pan from the oven and place it on a wire rack to cool completely at room temperature, about 1 hour. Once it’s no longer warm, transfer the pan to the refrigerator and chill for at least 4 hours, preferably overnight. This step is crucial—the bars need time to set properly. Cutting them too early will result in a goopy mess. I know it’s hard to wait, but I promise it’s worth it.
Step 8: Cut and Serve (10 minutes)
Once fully chilled, use the parchment overhang to lift the entire block of cheesecake bars out of the pan and onto a cutting board. Use a sharp knife to cut into 16 squares (4 rows by 4 rows). For clean cuts, wipe the knife clean between each slice. You can serve them cold, or let them sit at room temperature for 15 minutes to soften slightly. I prefer them cold—the texture is firmer and the flavors seem more pronounced.
Cooking Tips & Techniques
Over the years, I’ve made every mistake you can imagine with cheesecake bars. Here’s what I’ve learned so you don’t have to repeat my failures.
The Room Temperature Rule is Real. I cannot stress this enough—your cream cheese, sour cream, and eggs must be at room temperature. Cold ingredients create a lumpy batter that won’t bake evenly. I’ve tried shortcuts, and they always end in tears (or at least a lumpy cheesecake). Take everything out of the fridge an hour before you start. If you forget, you can soften cream cheese in the microwave at 50% power in 10-second bursts, but it’s risky—hot spots can melt the cream cheese and ruin the texture.
Don’t Overmix the Batter. Once the eggs go in, mix on low speed and stop as soon as the yolk disappears. Overmixing incorporates too much air, which expands during baking and then collapses, causing cracks. You want a dense, creamy texture, not a fluffy one.
The Jiggle Test is Your Friend. When you think the bars might be done, gently shake the pan. The center should wobble like Jell-O, not slosh like liquid. If it’s completely firm, you’ve overbaked them. If it ripples like a wave, they need more time. This takes practice, but you’ll get a feel for it.
Chill Overnight for Best Results. I know 4 hours seems like forever, but overnight chilling gives the flavors time to meld and the texture to set perfectly. The bars cut cleaner, taste better, and have a more uniform consistency. I once served them after only 3 hours, and they were still a bit soft in the center. Patience is a virtue, especially with cheesecake.
Use a Hot Knife for Clean Cuts. Run your knife under hot water, dry it off, then cut. The heat helps the knife glide through the cheesecake without dragging. Clean the knife between each cut for the prettiest bars. This is a game-changer if you’re serving these to guests.
Variations & Adaptations
One of the best things about this recipe is how adaptable it is. Here are some variations I’ve tried and loved.
Pumpkin Cheesecake Bars: Reduce the cream cheese to 12 ounces and add 1/2 cup (120g) pumpkin puree to the filling along with 1 teaspoon pumpkin pie spice. The pumpkin adds moisture, so you might need to bake for an extra 5 minutes. This is my favorite fall twist—it’s like pumpkin pie and cheesecake had a beautiful baby.
Chocolate Gingersnap Crust: Replace half the gingersnap crumbs with chocolate wafer crumbs (like Oreo crumbs without the filling). The combination of chocolate and ginger is unexpectedly amazing. I discovered this by accident when I ran out of gingersnaps and had to improvise.
Apple Cider Cheesecake Bars: Reduce the sour cream to 2 tablespoons and add 2 tablespoons of apple cider concentrate (not the drink, the concentrated syrup you find near the apple cider). Swirl in some finely diced, sautéed apples before baking. The apple flavor is subtle but definitely there, and it pairs beautifully with the gingersnap crust.
Vegan Version: Use dairy-free cream cheese (like Violife or Kite Hill), a plant-based butter substitute, and a flax egg (1 tablespoon ground flaxseed mixed with 3 tablespoons water per egg). The texture will be slightly less dense, but the flavor is still fantastic. I made this for a vegan friend, and she asked for the recipe twice.
Mini Cheesecake Bites: Press the crust mixture into a mini muffin tin (lined with mini paper liners) and fill with the cheesecake batter. Bake for 15-18 minutes. These are perfect for parties or when you want a smaller treat. Just don’t expect them to last long—they’re dangerously poppable.
Serving & Storage Suggestions
These cozy fall cheesecake bars are versatile enough for any occasion. Here’s how to serve and store them for the best experience.
Serving: Serve the bars cold or at room temperature. I prefer them straight from the fridge—the texture is firmer, and the flavors seem more concentrated. If you want to dress them up, add a dollop of whipped cream, a drizzle of extra caramel sauce, or a sprinkle of flaky sea salt. For an extra touch, serve with a side of warm apple cider or a hot cup of chai tea. The spices in the bars complement both drinks beautifully.
Storage: Store leftover bars in an airtight container in the refrigerator for up to 5 days. Place a layer of parchment paper between any stacked bars to prevent them from sticking together. The flavor actually improves after a day or two as the ingredients meld, so don’t be afraid to make these ahead of time.
Freezing: These bars freeze exceptionally well. Once they’re fully chilled and cut, place the individual bars on a baking sheet and freeze until solid (about 2 hours). Transfer the frozen bars to a freezer-safe container or zip-top bag, separating layers with parchment paper. They’ll keep for up to 3 months. To thaw, transfer the bars to the refrigerator overnight. I always keep a stash in my freezer for unexpected guests or late-night cravings.
Reheating: I don’t recommend reheating these bars—they’re meant to be served cold. But if you want a slightly softer texture, let them sit at room temperature for 15-20 minutes before serving. If you’ve frozen them, thaw them in the fridge overnight for the best results.
Nutritional Information & Benefits
Let’s be real—these are a treat, not a health food. But there are some redeeming qualities worth mentioning.
Estimated Nutritional Values (per bar, based on 16 servings):
- Calories: 285
- Total Fat: 18g
- Saturated Fat: 10g
- Cholesterol: 75mg
- Sodium: 220mg
- Total Carbohydrates: 28g
- Dietary Fiber: 0.5g
- Sugars: 20g
- Protein: 4g
Health Benefits of Key Ingredients:
- Ginger in the crust is known for its anti-inflammatory properties and can aid digestion. It’s also warming and comforting, perfect for fall.
- Cream cheese provides calcium and protein, though it’s also high in fat. Using full-fat cream cheese is actually better for baking because it has fewer additives and stabilizers.
- Eggs are a great source of high-quality protein and essential vitamins like B12 and D.
Dietary Considerations: This recipe contains gluten, dairy, and eggs. For gluten-free, dairy-free, or vegan options, see the variations section above. If you’re watching your sugar intake, you can reduce the sugar in the filling to 1/2 cup, but the texture will be slightly less creamy.
I believe in enjoying treats in moderation. These bars are special enough that one or two are completely satisfying. They’re not an everyday snack, but they’re perfect for celebrating the season or treating yourself after a long week.
Conclusion
These cozy fall cheesecake bars with gingersnap crust have become a staple in my kitchen for good reason. They’re simple enough for a weekday baking project but impressive enough for a holiday table. The combination of the spicy, crunchy crust and the silky, tangy cheesecake filling is honestly one of my favorite flavor pairings of all time. Every time I make them, I think of Carol’s kitchen and that perfect October afternoon.
I hope you’ll give these a try and make them your own. Maybe you’ll add a different swirl, or try the pumpkin variation, or serve them with a drizzle of honey instead of caramel. The beauty of this recipe is that it’s a canvas for your creativity. Don’t be afraid to experiment—some of my best baking discoveries have come from happy accidents.
If you make these bars, I’d love to hear about it! Leave a comment below and tell me how they turned out, or share your own twist on the recipe. Tag me in your photos on social media—I’m always excited to see what you create. And if you’re looking for more fall baking inspiration, check out my gingerbread cookies or pumpkin bread recipes. Happy baking, friends!
Frequently Asked Questions
Can I use a different type of cookie for the crust?
Absolutely! While gingersnaps are my favorite for fall, you can use graham crackers, shortbread cookies, or even vanilla wafers. Just keep in mind that the flavor profile will change. If you use a milder cookie, you might want to add extra cinnamon or ginger to the crust to maintain that fall vibe.
Why did my cheesecake bars crack on top?
Cracks usually happen from overbaking or overmixing the batter. Make sure you’re not baking past the point where the center still has a slight jiggle. Also, avoid overbeating the eggs—mix just until they’re incorporated. If your oven runs hot, try reducing the temperature to 325°F (160°C) and baking a few minutes longer.
Can I make these cheesecake bars ahead of time?
Yes, and I actually recommend it! These bars taste even better after a day or two in the fridge because the flavors have time to meld. You can make them up to 3 days in advance and store them in the refrigerator. They also freeze beautifully for up to 3 months.
How do I know when the cheesecake bars are done baking?
The edges should look set and slightly puffed, while the center should still have a slight jiggle when you gently shake the pan. It’s better to underbake slightly than overbake—the residual heat will continue to cook the bars as they cool. If you’re unsure, insert a toothpick near the center; it should come out with a few moist crumbs, not wet batter.
Can I use low-fat or non-fat cream cheese?
I don’t recommend it. Low-fat cream cheese has a higher water content, which can make the filling watery and prevent it from setting properly. Full-fat cream cheese gives you that rich, creamy texture that makes these bars so special. If you’re looking for a lighter option, try reducing the sugar or using a smaller portion size instead.
Pin This Recipe!
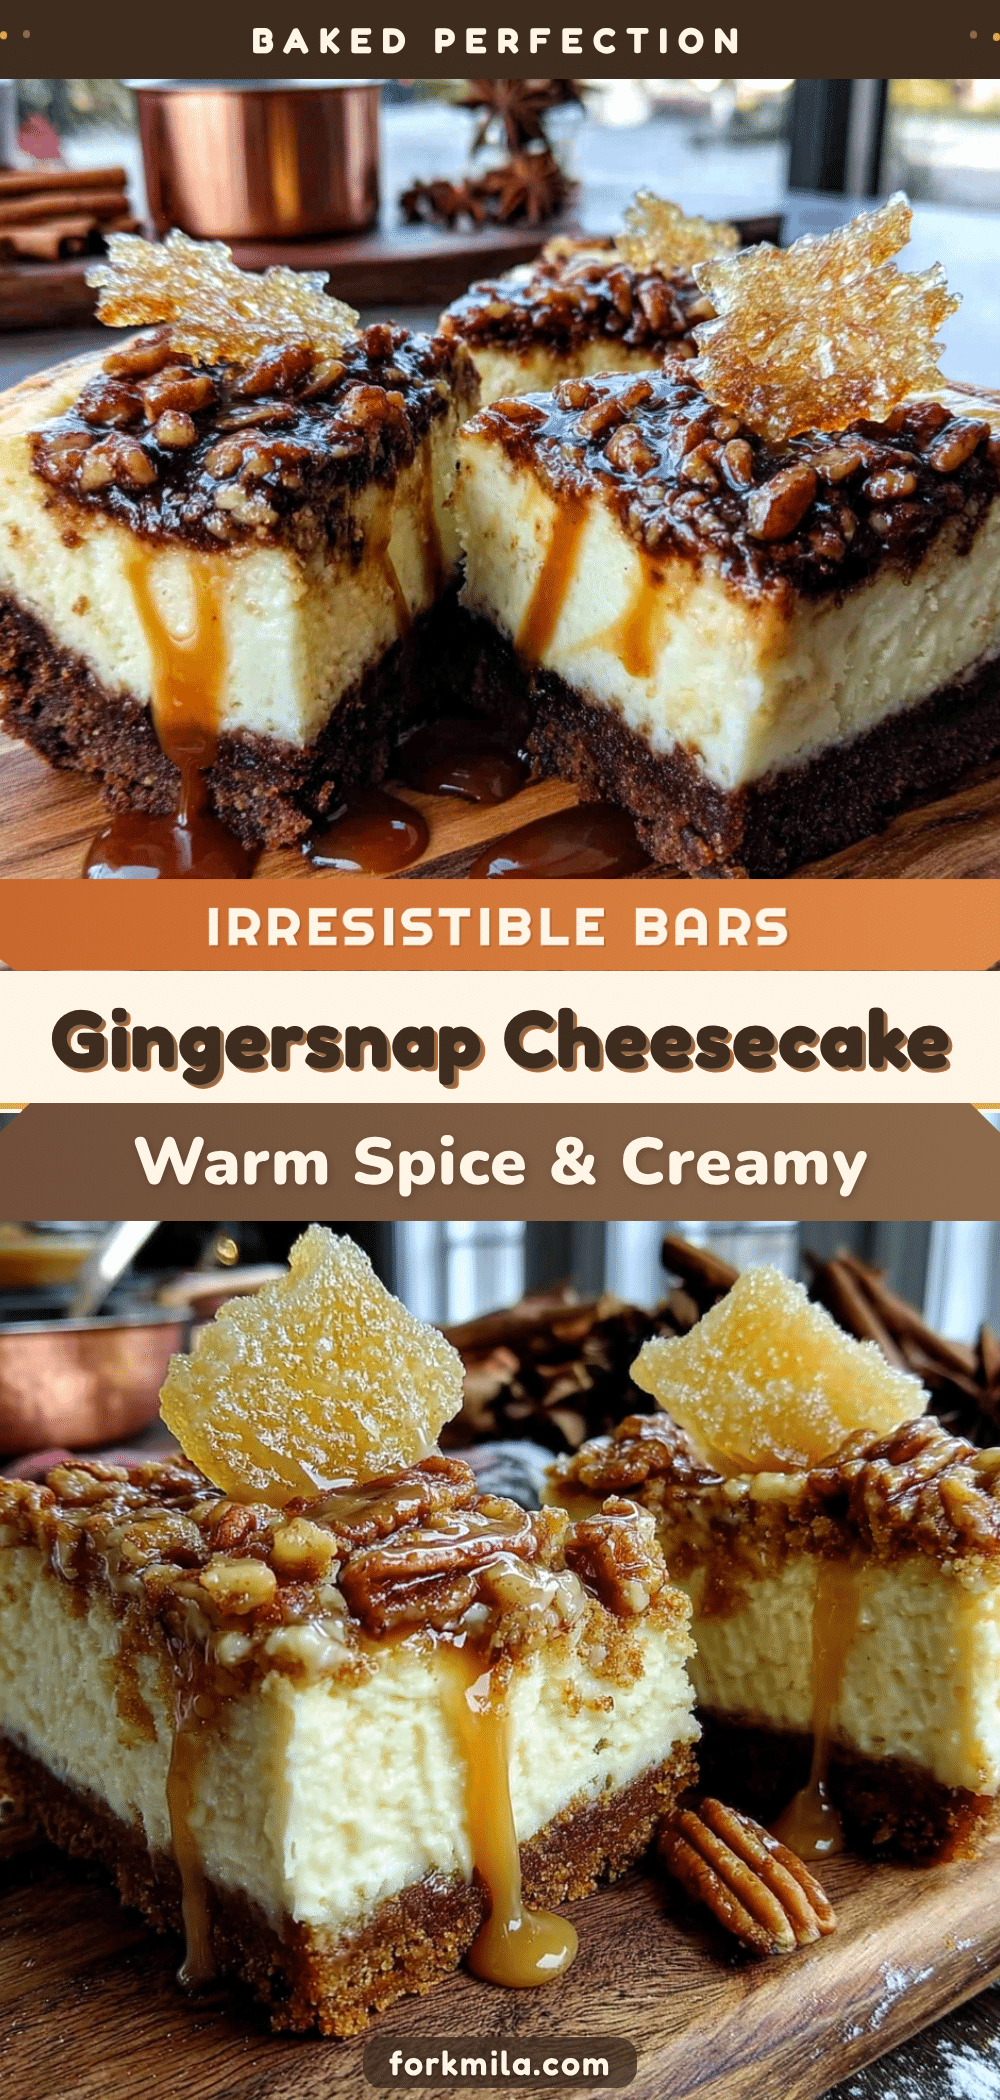
Cozy Fall Cheesecake Bars with Gingersnap Crust
These creamy cheesecake bars feature a spiced gingersnap crust and a silky filling, swirled with salted caramel for a perfect fall dessert. Easy to make and always a crowd-pleaser.
- Prep Time: 30 minutes
- Cook Time: 45 minutes
- Total Time: 5 hours 15 minutes (includes chilling)
- Yield: 16 servings 1x
- Category: Dessert
- Cuisine: American
Ingredients
- 2 cups (about 200g) gingersnap cookie crumbs (from about 8 ounces of cookies)
- 1/4 cup (50g) granulated sugar
- 1/2 teaspoon ground cinnamon
- 1/4 teaspoon ground nutmeg
- 6 tablespoons (85g) unsalted butter, melted
- 16 ounces (450g) cream cheese, softened to room temperature
- 3/4 cup (150g) granulated sugar
- 1/4 cup (60g) sour cream, room temperature
- 2 teaspoons vanilla extract
- 1 tablespoon fresh lemon juice
- 1/4 teaspoon salt
- 2 large eggs, room temperature
- 1/3 cup (80ml) store-bought or homemade salted caramel sauce (optional)
Instructions
- Preheat oven to 350°F (175°C). Line a 9×9-inch baking pan with parchment paper, leaving overhang on two sides. Lightly spray with non-stick spray.
- Make the crust: Pulse gingersnap cookies in a food processor until fine crumbs form. Transfer to a bowl and mix with sugar, cinnamon, nutmeg, and melted butter until moistened like wet sand.
- Press the crumb mixture firmly and evenly into the prepared pan using the bottom of a measuring cup. Bake for 10 minutes, then set aside to cool slightly. Keep oven on.
- Make the filling: In a large bowl, beat cream cheese with an electric mixer on medium speed until smooth, about 2 minutes. Add sugar and beat until light and fluffy, about 1 minute.
- Add sour cream, vanilla extract, lemon juice, and salt; beat on low until combined. Scrape down the bowl.
- Add eggs one at a time, beating on low just until incorporated. Do not overmix.
- Pour filling over the pre-baked crust and spread evenly. If using caramel sauce, warm slightly, drop spoonfuls over the filling, and swirl gently with a knife or toothpick.
- Bake for 40-45 minutes, until edges are set and center jiggles slightly. Tent with foil if browning too quickly.
- Cool completely on a wire rack (about 1 hour), then refrigerate for at least 4 hours, preferably overnight.
- Lift bars out using parchment overhang, cut into 16 squares with a sharp knife (wipe clean between cuts). Serve cold or at room temperature.
Notes
Ensure all dairy ingredients are at room temperature for a smooth filling. Do not overmix after adding eggs to prevent cracks. Chill overnight for best texture and flavor. For clean cuts, use a hot knife and wipe between slices.
Nutrition
- Serving Size: 1 bar
- Calories: 285
- Sugar: 20
- Sodium: 220
- Fat: 18
- Saturated Fat: 10
- Carbohydrates: 28
- Fiber: 0.5
- Protein: 4
Keywords: cheesecake bars, fall dessert, gingersnap crust, caramel swirl, easy cheesecake, autumn baking


