The summer I moved into my new apartment, I wasn’t expecting to become the neighborhood dessert person. Honestly, I was just unpacking boxes and trying to figure out how to fit my oversized mixer on the tiny kitchen counter when my quiet next-door neighbor, Mrs. Jenkins—the lady who always wore bright red lipstick and knitted sweaters—popped her head in and started chatting about this “firecracker cake” she swore by for the 4th of July. I mean, you wouldn’t peg her for a dessert maven, right? But there she was, describing this Festive Firecracker Red White and Blue Layered Jello Poke Cake with such enthusiasm, I found myself scribbling notes on the back of an old grocery receipt.
She told me how the cake was a total showstopper, with vibrant layers that look like a little fireworks display on a plate, and how it’s somehow light and refreshing despite the rich, creamy layers. I forgot to grab a bowl to mix the pudding, got flour all over the counter, and had to pause because the ice cream truck’s jingle drifted by—classic kitchen chaos. But that night, I made the cake, and let me tell you, the burst of red, white, and blue wasn’t just pretty—it was pure celebration in every bite. Maybe you’ve been there, wanting a dessert that feels festive but isn’t a hassle, and this recipe stuck with me for that reason. It’s the kind of dessert that sneaks into your summer memories, turning ordinary gatherings into something a little more memorable.
Why You’ll Love This Recipe
After testing and retesting this Festive Firecracker Red White and Blue Layered Jello Poke Cake, I can honestly say it’s a winner in more ways than one. Whether you’re a busy host or just craving a sweet treat that’s easy to pull together, this recipe ticks all the boxes. Let me break down why it’s such a crowd-pleaser:
- Quick & Easy: The cake comes together in under an hour, including chilling time, making it perfect for last-minute 4th of July celebrations or casual backyard barbecues.
- Simple Ingredients: No need to hunt down specialty items—most of the ingredients are pantry staples or easy to find at your local store.
- Perfect for Summer Parties: This cake’s cool, jiggly layers and creamy texture make it a refreshing dessert ideal for warm-weather get-togethers.
- Crowd-Pleaser: Kids love the bright colors and fun textures, while adults appreciate the nostalgic nod to classic Jello desserts with a modern twist.
- Unbelievably Delicious: The combination of moist cake poked with vibrant jello, topped with creamy pudding and whipped cream, creates a flavor and texture combo that’s downright addictive.
What really sets this apart from other poke cakes is the layering technique—each color gets its moment to shine without bleeding into the next. Plus, the creamy vanilla pudding layer adds richness that balances the fruity jello flavors perfectly. This isn’t just your average red, white, and blue dessert; it’s the kind of festive treat that feels thoughtfully made, even if you whip it up in a flash. Honestly, it’s the kind of cake that makes you close your eyes after the first bite and smile because it tastes like summer, celebration, and fun all wrapped into one.
What Ingredients You Will Need
This Festive Firecracker Red White and Blue Layered Jello Poke Cake uses simple, wholesome ingredients to deliver bold flavor and that fun, patriotic look without any fuss. Most of these are pantry staples, and a few are easy to swap if you want to customize.
- For the Cake Base:
- 1 box white cake mix (I recommend Betty Crocker for a reliable, fluffy texture)
- Ingredients listed on the cake mix box (usually eggs, oil, and water)
- For the Jello Layers:
- 1 box (3 oz / 85 g) strawberry or cherry flavored Jello (red layer)
- 1 box (3 oz / 85 g) blueberry or mixed berry flavored Jello (blue layer)
- 1 cup (240 ml) boiling water for each Jello box
- 1 cup (240 ml) cold water for each Jello box
- For the Creamy Layer:
- 1 package (3.4 oz / 96 g) instant vanilla pudding mix (I prefer Jell-O brand for smooth consistency)
- 2 cups (480 ml) cold milk
- For the Topping:
- 2 cups (480 ml) whipped cream or whipped topping (use dairy-free if preferred)
- Optional Garnishes:
- Fresh strawberries, blueberries, or red and blue sprinkles for extra festive flair
Feel free to swap the pudding mix for a sugar-free or dairy-free option if needed. Also, in summer, fresh berries make a delightful finishing touch, but frozen berries work well if you don’t have fresh on hand. The cake mix can be homemade too, but the boxed mix saves time and still yields excellent results, especially when you’re juggling other party prep.
Equipment Needed
To whip up this vibrant Festive Firecracker Red White and Blue Layered Jello Poke Cake, you’ll need just a handful of standard kitchen tools. Nothing fancy, which is part of the charm:
- 9×13-inch (23×33 cm) baking pan – Glass or metal works fine; glass lets you see the colorful layers better.
- Mixing bowls – At least two; one for cake batter, one for pudding, and separate bowls for preparing each Jello flavor.
- Whisk or electric mixer – For mixing the pudding and whipping cream.
- Spoon or fork – To poke holes in the baked cake and to help pour in the Jello.
- Measuring cups and spoons – For precise liquid and dry ingredient measurements.
- Refrigerator – To chill the cake and set the layers properly.
If you don’t have an electric mixer, no worries—whisking by hand works, though it might take a bit more elbow grease. I’ve made this cake in a Pyrex dish, and it’s sturdy and easy to clean. When it comes to maintenance, make sure your mixing bowls are clean and dry before whipping the cream to help it hold volume better. Budget-friendly plastic bowls work fine for mixing but avoid plastic for serving if you want a nicer presentation.
Preparation Method
- Prepare and Bake the Cake: Preheat your oven to 350°F (175°C). Grease your 9×13-inch (23×33 cm) baking pan lightly with butter or non-stick spray. Mix the white cake batter according to the box instructions—usually 1 cup water, 1/3 cup oil, and 3 large eggs (about 150 g). Pour the batter evenly into the pan and bake for 30-35 minutes, or until a toothpick inserted in the center comes out clean. Let the cake cool completely—this usually takes about 1 hour, but don’t rush it; warm cake won’t absorb the Jello properly.
- Make the Jello Layers: While the cake cools, prepare each Jello flavor separately. Dissolve each 3 oz (85 g) box in 1 cup (240 ml) boiling water, stirring until fully dissolved. Then add 1 cup (240 ml) cold water to each. Let them cool to room temperature but do not refrigerate yet—this helps the Jello soak without melting the cake.
- Poke and Pour: Once the cake is fully cooled, use a fork or wooden spoon handle to poke holes all over the surface, about 1 inch (2.5 cm) apart. Pour the red Jello evenly over one half of the cake, letting it sink into the holes gently. Pour the blue Jello over the other half. You can get creative here—some like to pour in stripes or overlapping patterns. Place the cake in the fridge for about 1 hour to let the Jello set lightly.
- Prepare the Vanilla Pudding Layer: While the Jello sets, whisk the instant vanilla pudding mix with 2 cups (480 ml) cold milk using an electric mixer or whisk. Whisk for 2 minutes until thickened. Spread this creamy layer evenly over the chilled cake. Return the cake to the fridge for another 30 minutes to let the pudding firm up.
- Top with Whipped Cream: Finally, spread 2 cups (480 ml) of whipped cream or whipped topping over the pudding layer. Smooth it out with a spatula or knife. For an extra festive touch, sprinkle fresh berries or red and blue sprinkles on top.
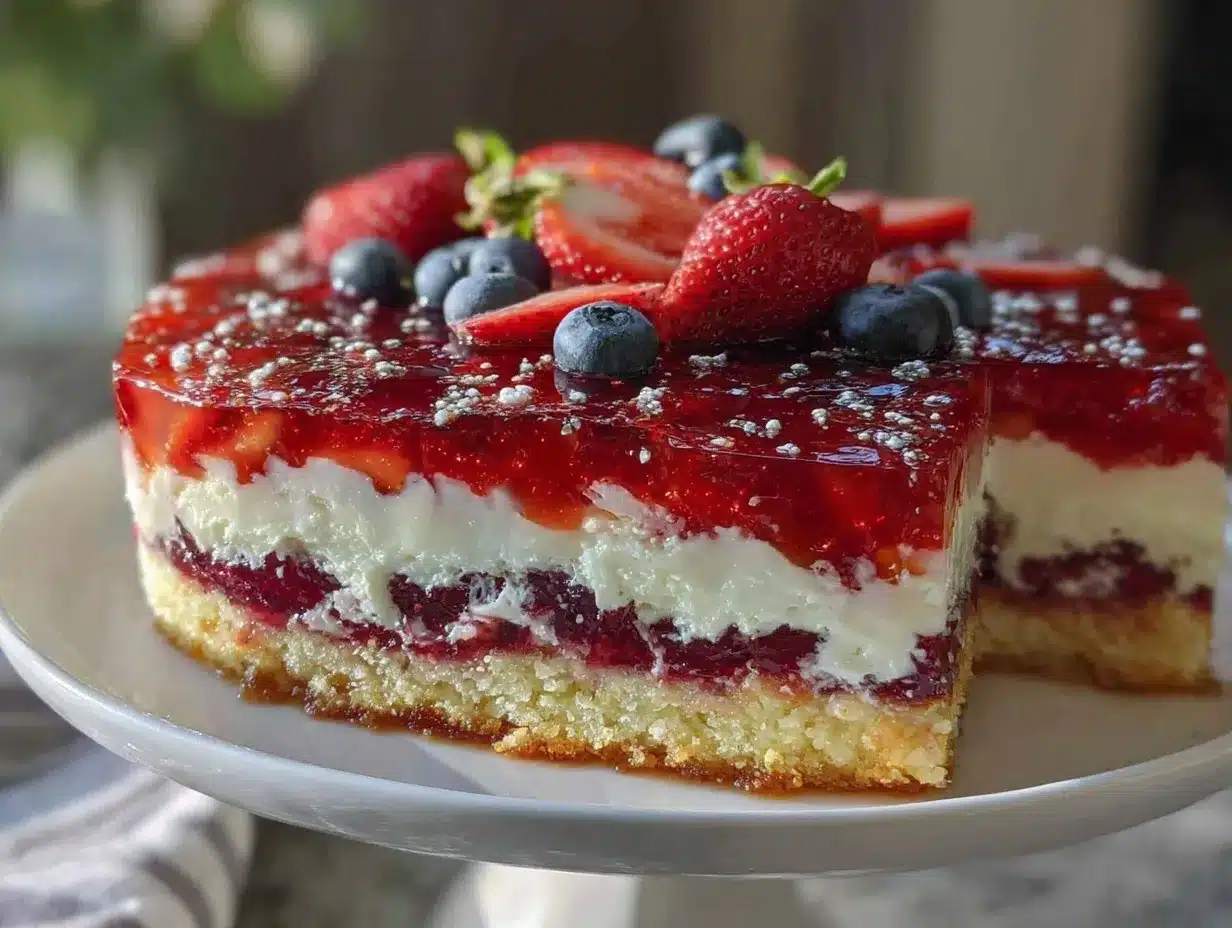
- Chill Before Serving: Let the entire cake chill for at least 2 hours before serving. This helps all the layers meld together and makes slicing cleaner. When you cut into it, you’ll see those bright, festive layers shining through—just like fireworks on a plate.
Tip: If your Jello starts to set before pouring, gently warm it in the microwave for a few seconds until pourable again. Also, don’t skip the full chilling time—trust me on this one, the flavors and textures need it! In my first attempt, I was impatient and cut the cake too soon; it looked messy but still tasted good (lesson learned).
Cooking Tips & Techniques
Making this layered Jello poke cake is pretty straightforward, but a few tricks can save you from rookie mistakes and make your cake look and taste top-notch.
- Don’t Rush Cooling: Let the cake cool completely before poking holes. Warm cake can make the Jello run off or not absorb properly, resulting in a soggy mess.
- Poke Evenly and Deep Enough: Use a fork or wooden spoon handle to poke holes that go deep but don’t pierce the bottom. Consistent spacing ensures the Jello flavors soak evenly.
- Let Jello Cool Before Pouring: Hot Jello can melt the cake’s crumb and ruin the texture. Let it cool but stay liquid enough to pour smoothly.
- Chill Between Layers: Patience is key here. Each layer needs time to set for clean, distinct colors and flavors.
- Whip Cream Properly: If using homemade whipped cream, chill your bowl and beaters beforehand. Over-whipping can cause it to turn grainy, so stop when soft peaks form.
- Use a Serrated Knife for Slicing: This helps cut the layered cake cleanly without squashing the delicate jello and pudding layers.
- Multitasking: Start the pudding while the Jello is setting, and prepare the whipped cream last. This helps keep the workflow smooth and your kitchen less chaotic.
Personally, my first try had a teeny bit of Jello mix-up—I poured the blue where the red should have been. It was a hilarious learning moment that reminded me to label bowls clearly! Keep tasting as you go, and trust your instincts on texture and color. The more you make this, the easier it gets.
Variations & Adaptations
This Festive Firecracker Red White and Blue Layered Jello Poke Cake is flexible and plays well with tweaks. Here are some ideas if you want to switch things up or accommodate different needs:
- Dietary Variations: Use sugar-free or gelatin-free Jello alternatives for a lower-sugar or vegetarian-friendly version. Swap the pudding mix with coconut milk-based pudding for dairy-free options.
- Seasonal Twists: Instead of Jello, try using homemade fruit gelatin layers with fresh pureed berries for a more natural flavor. In winter, warm the pudding with a sprinkle of cinnamon for a cozy twist.
- Flavor Swaps: Replace the vanilla pudding with chocolate or lemon pudding to add different flavor profiles. You can also try lime or raspberry Jello for the red layer for a tangier kick.
- Cooking Method Adjustments: If you prefer, bake the cake in cupcakes to make individual servings. Poke holes and pour Jello in the same way, then chill and top with whipped cream.
- Personal Favorite: I once added a thin layer of cream cheese frosting under the pudding for a tangy contrast that was surprisingly delicious and a bit more decadent.
Serving & Storage Suggestions
This cake is best served chilled, straight from the refrigerator. The layers hold their shape beautifully when cold, and the creamy textures are most refreshing that way. For presentation, I like to garnish with a few fresh strawberries and blueberries on top, adding a little extra pop of color and freshness.
It pairs wonderfully with a light lemonade or an iced tea for a quintessential summer combo. If you’re serving at a party, cut it into squares or rectangles and use a spatula to lift each piece carefully to keep those layers intact.
To store, cover the cake tightly with plastic wrap or an airtight lid and keep it refrigerated. It will stay fresh for up to 3 days. You can freeze it, but the texture of the jello and whipped cream might change after thawing, so I recommend enjoying it fresh if possible.
When reheating, avoid microwaving to keep the layers intact; instead, let slices come to room temperature for about 10 minutes before serving. The flavors tend to meld and deepen after resting, so leftovers can be surprisingly delicious the next day.
Nutritional Information & Benefits
This layered Jello poke cake is more of a festive indulgence than a health food, but it does feature some benefits. The fruit-flavored Jello provides a light, fruity sweetness without heavy sugar overload, especially if you opt for sugar-free versions. The pudding and whipped cream add richness and calcium, making it a creamy, satisfying treat.
Here’s an approximate nutritional breakdown per serving (1/12th of the cake):
| Calories | Fat | Carbohydrates | Protein |
|---|---|---|---|
| 280 | 10g | 42g | 3g |
For gluten-free fans, use a gluten-free white cake mix or homemade gluten-free cake base. This recipe contains dairy and gelatin, so it’s not suitable for vegans unless you substitute with plant-based pudding and gelatin alternatives like agar-agar.
Personally, I find this cake a joyful way to bring some color and fun to my summer desserts without feeling weighed down—sometimes, that’s exactly the balance I need.
Conclusion
If you’re looking for a dessert that’s festive, fun, and fuss-free for your next patriotic celebration, this Festive Firecracker Red White and Blue Layered Jello Poke Cake is a fantastic choice. It’s colorful, creamy, and a little nostalgic, but with a fresh twist that makes it stand out from the usual red-white-blue offerings. Customize it however you like, depending on your taste or dietary needs, and feel free to get creative with your garnishes.
This recipe has become a staple in my summer dessert lineup, and I hope it finds a place in your kitchen too. If you try it, I’d love to hear how your version turned out—drop a comment or share any fun tweaks you made. Here’s to many joyful celebrations and sweet slices ahead!
FAQs
- Can I use homemade cake instead of a box mix?
Absolutely! A homemade white or yellow cake works great and adds a personal touch. - How far in advance can I make this cake?
You can prepare it up to 2 days ahead and keep it refrigerated for best texture and flavor. - Can I substitute the Jello flavors?
Yes, feel free to swap for other red and blue Jello flavors or even make fruit gelatin layers from scratch. - What if I don’t have instant pudding mix?
You can make pudding from scratch or use a ready-made pudding cup; just ensure it sets firm enough to layer. - Is it possible to make this dairy-free?
Yes, use dairy-free milk, pudding mixes, and whipped toppings to make a vegan-friendly version.
Pin This Recipe!
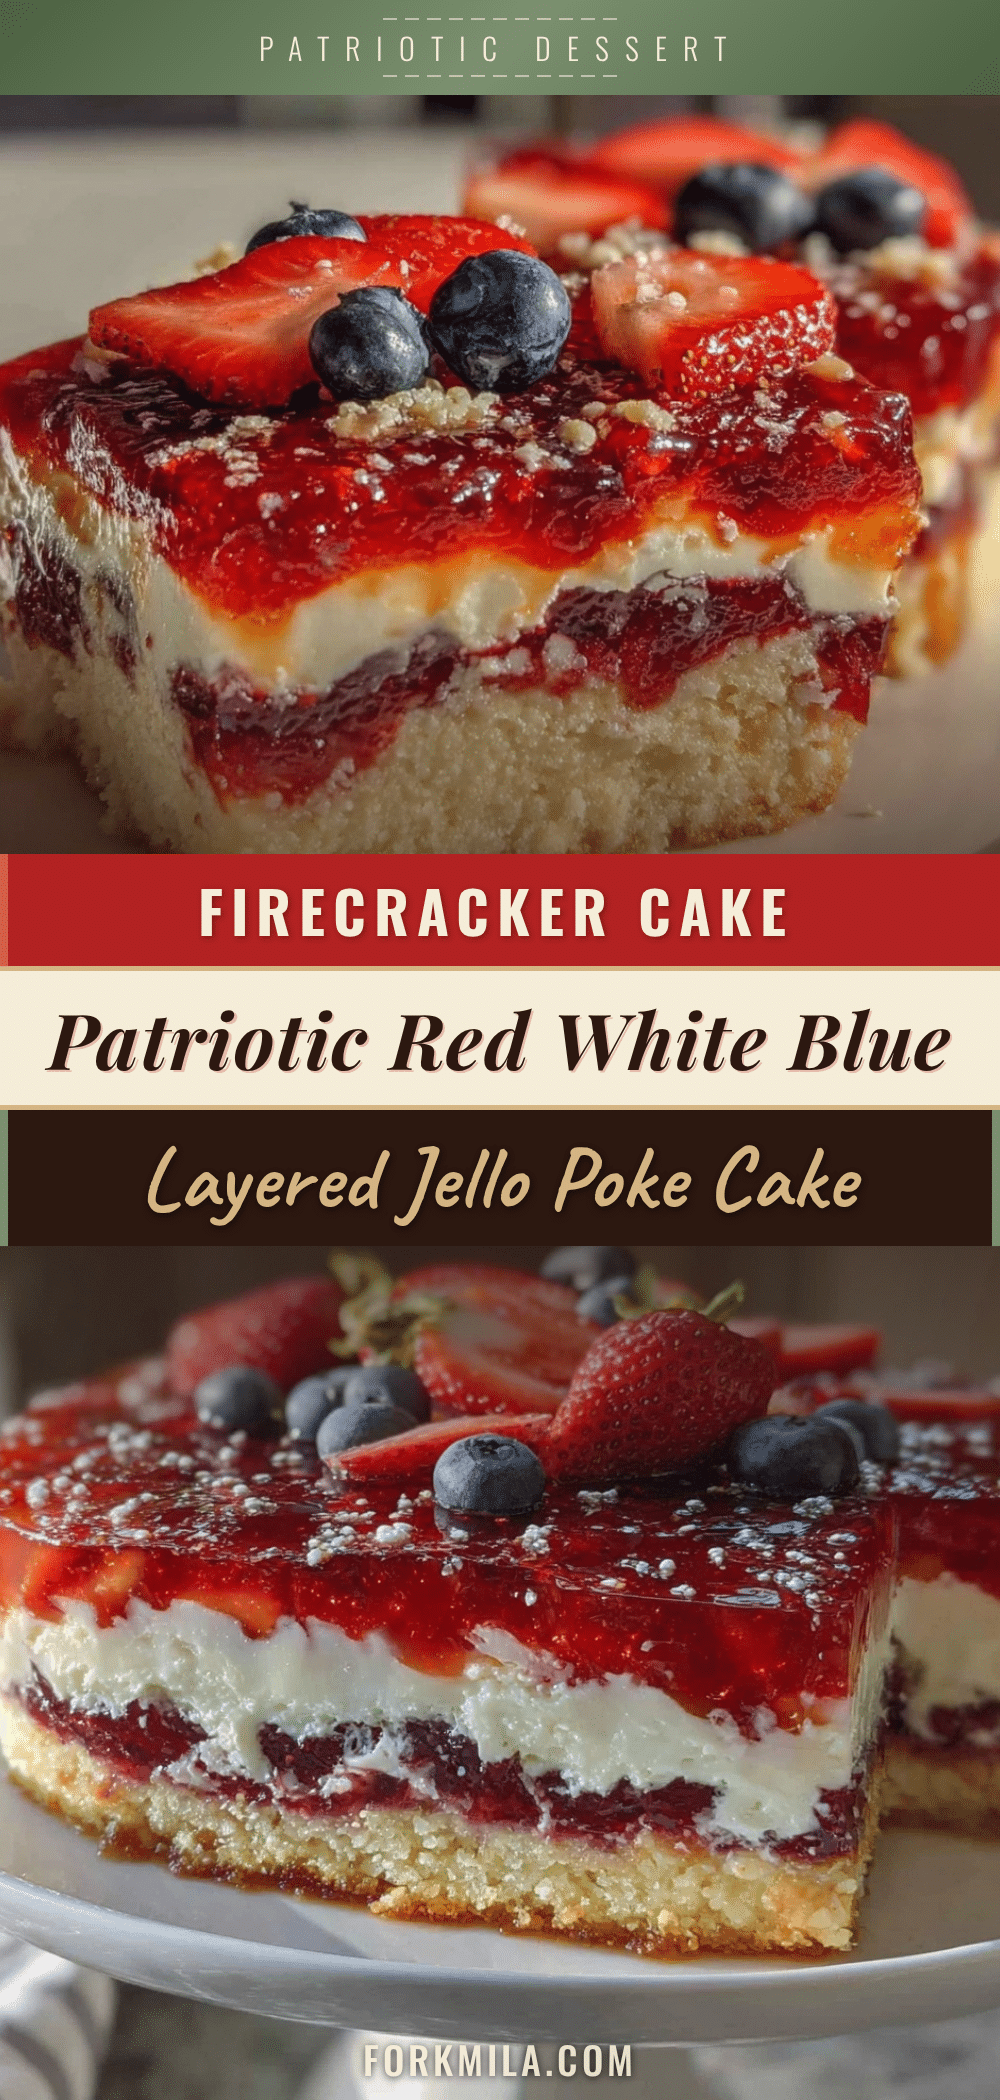
Festive Firecracker Red White and Blue Layered Jello Poke Cake

A vibrant and refreshing layered poke cake featuring red and blue Jello layers, creamy vanilla pudding, and whipped cream topping, perfect for 4th of July celebrations and summer parties.
- Prep Time: 20 minutes
- Cook Time: 35 minutes
- Total Time: 3 hours 55 minutes
- Yield: 12 servings 1x
- Category: Dessert
- Cuisine: American
Ingredients
- 1 box white cake mix (e.g., Betty Crocker)
- Ingredients listed on the cake mix box (usually 3 large eggs, 1/3 cup oil, 1 cup water)
- 1 box (3 oz) strawberry or cherry flavored Jello (red layer)
- 1 box (3 oz) blueberry or mixed berry flavored Jello (blue layer)
- 1 cup boiling water for each Jello box
- 1 cup cold water for each Jello box
- 1 package (3.4 oz) instant vanilla pudding mix (e.g., Jell-O brand)
- 2 cups cold milk
- 2 cups whipped cream or whipped topping (dairy-free optional)
- Optional garnishes: fresh strawberries, blueberries, red and blue sprinkles
Instructions
- Preheat oven to 350°F (175°C). Grease a 9×13-inch baking pan with butter or non-stick spray.
- Prepare white cake batter according to box instructions (usually 3 large eggs, 1/3 cup oil, 1 cup water). Pour batter evenly into pan.
- Bake for 30-35 minutes or until a toothpick inserted in the center comes out clean. Let cake cool completely (about 1 hour).
- Dissolve each 3 oz Jello box in 1 cup boiling water, stirring until fully dissolved. Add 1 cup cold water to each. Let cool to room temperature but do not refrigerate.
- Poke holes about 1 inch apart all over the cooled cake using a fork or wooden spoon handle.
- Pour red Jello evenly over one half of the cake, blue Jello over the other half. Refrigerate for 1 hour to let Jello set lightly.
- Whisk instant vanilla pudding mix with 2 cups cold milk until thickened (about 2 minutes). Spread pudding evenly over chilled cake.
- Return cake to fridge for 30 minutes to let pudding firm up.
- Spread 2 cups whipped cream evenly over pudding layer. Smooth with spatula or knife.
- Optionally, garnish with fresh berries or red and blue sprinkles.
- Chill entire cake for at least 2 hours before serving to meld flavors and set layers.
Notes
Let the cake cool completely before poking holes to prevent sogginess. Cool Jello before pouring to avoid melting the cake. Chill between layers for clean, distinct colors. Use a serrated knife for clean slicing. If Jello sets before pouring, gently warm it to make it pourable again. Cake can be made up to 2 days ahead and stored refrigerated. For dairy-free or vegan versions, use appropriate pudding and whipped topping substitutes.
Nutrition
- Serving Size: 1 slice (1/12th of c
- Calories: 280
- Fat: 10
- Carbohydrates: 42
- Protein: 3
Keywords: 4th of July dessert, poke cake, layered Jello cake, patriotic dessert, summer cake, easy dessert, festive cake