I was standing in the middle of the spice aisle at my local grocery store last October, staring blankly at the pumpkin pie spice, when the smell of someone’s coffee nearby hit me. It wasn’t just any coffee—it was that slightly burnt, nutty scent you get when butter has been left on the stove a minute too long. And just like that, I was twenty-two again, standing in my first tiny apartment kitchen at 11 PM on a Tuesday, holding a whisk and trying to remember if my mom’s cookie recipe called for nutmeg or cloves. I had called her three times that night, and she had answered twice. The third time, she let it go to voicemail, probably because she knew I was overthinking it. That night, I made a batch of cookies that were too flat, too spicy, and honestly, a little sad. But the butter—oh, the butter. I had accidentally browned it while taking a phone call from my friend Jen, who was crying about her cat. That mistake changed everything. The nuttiness, the warmth, the way it made the whole apartment smell like a hug you didn’t know you needed. I’ve been chasing that feeling ever since. These brown butter pumpkin snickerdoodle cookies are the result of that happy accident, refined over a dozen batches and a few more phone calls I probably should have ignored. Maybe you’ve had a moment like that—where a recipe starts with a mistake and ends up being the one you keep coming back to. This is that cookie for me.
Why You’ll Love This Recipe
Let me tell you—after testing this recipe about seven times in one weekend (my neighbors were very happy, my waistline less so), I can confidently say these are the cookies you want in your life this fall. They aren’t just another pumpkin cookie. They are the one that makes people hover around the cooling rack.
- Quick & Easy: From start to finish, you’re looking at about 30 minutes of active work. The dough needs a quick chill, but that’s hands-off time for you to clean up or, you know, sneak a spoonful of the brown butter before it disappears.
- Simple Ingredients: No weird extracts or hard-to-find flours. You probably have most of this in your pantry right now. The only “special” thing is the pumpkin puree, and that’s a fall staple.
- Perfect for Fall Gatherings: These are made for cozy sweater weather, apple picking afternoons, and Thanksgiving dessert tables. They bring that warm, spiced energy without the stress of a pie.
- Crowd-Pleaser: I brought a batch to my book club last week, and they were gone in fifteen minutes. One woman asked for the recipe before she even finished chewing. That’s the kind of energy we’re going for.
- Unbelievably Delicious: The combo of nutty brown butter, earthy pumpkin, and that classic cinnamon-sugar coating? It’s next-level. The edges are slightly crisp, the centers are soft and pillowy, and the flavor is deep and cozy.
What makes these different from every other pumpkin snickerdoodle out there is the brown butter. It adds a toasty, almost caramel-like richness that pumpkin alone just can’t deliver. I’ve tested versions with and without it, and honestly, the difference is night and day. This isn’t just another version of a fall cookie—it’s the one you’ll bookmark and make every single year.
What Ingredients You Will Need
This recipe uses simple, wholesome ingredients that come together to create something truly special. The magic is in the technique, not a long list of fancy items. Here’s what you’ll need to grab:
- Unsalted butter: 1 cup (2 sticks). You’ll be browning this, so don’t use salted butter—it can throw off the flavor and make things too salty. I prefer using a good quality European-style butter like Kerrygold for a richer taste, but any unsalted butter works.
- Granulated sugar: 1 cup for the dough, plus 1/4 cup for rolling. The sugar in the dough helps create that soft, chewy texture. The extra sugar for rolling gives the cookies their signature crackly top.
- Light brown sugar: 1/2 cup, packed. This adds moisture and a hint of molasses that pairs beautifully with the pumpkin and spices. Don’t skip it—it’s not the same with just white sugar.
- Pumpkin puree: 1/2 cup. Make sure you grab pure pumpkin puree, not pumpkin pie filling. The pie filling has added sugar and spices that will mess with the balance. I usually go with Libby’s—it’s consistent and reliable.
- Large egg: 1, at room temperature. A room-temperature egg blends into the butter mixture more smoothly, giving you a better texture.
- Vanilla extract: 1 teaspoon. Pure vanilla extract is worth it here. The brown butter and pumpkin are bold flavors, and a good vanilla helps tie them together.
- All-purpose flour: 2 cups. Spoon and level your flour—don’t scoop directly from the bag. Scooping packs the flour and gives you dry, crumbly cookies. I learned that the hard way.
- Cream of tartar: 1 teaspoon. This is the secret to the snickerdoodle’s signature tangy flavor and soft texture. Don’t skip it. You can find it in the spice aisle.
- Baking soda: 1/2 teaspoon. Helps the cookies spread just enough without turning into pancakes.
- Salt: 1/2 teaspoon. I use fine sea salt. It balances the sweetness and enhances the brown butter flavor.
- Pumpkin pie spice: 1 teaspoon. You can use store-bought, or make your own with cinnamon, nutmeg, ginger, and cloves. I make my own because I like a little extra ginger.
- Cinnamon: 1 teaspoon for the dough, plus 1 tablespoon for the rolling mixture. Cinnamon and pumpkin are best friends. Don’t be shy with it.
- For the coating: 1/4 cup granulated sugar mixed with 1 tablespoon cinnamon. This is what gives the cookies that beautiful, sparkly crust.
Equipment Needed
You don’t need a professional bakery setup for these cookies. Here’s what you’ll want to have on hand:
- Light-colored saucepan or skillet: A light-colored pan is key for browning butter because you can actually see the color change. A dark pan makes it nearly impossible to tell when the butter is done, and you’ll end up with burnt butter. Trust me on this one.
- Mixing bowls: One medium bowl for the dry ingredients and one large bowl for the wet ingredients. I use glass bowls because they don’t retain smells.
- Hand mixer or stand mixer: You can do this by hand with a wooden spoon, but a mixer makes creaming the butter and sugar much easier. I use my trusty KitchenAid.
- Whisk: For mixing the dry ingredients and for whisking the brown butter as it cools.
- Rubber spatula: For scraping down the bowl and folding in the dry ingredients. Don’t use a metal spoon—you’ll scratch your bowls.
- Baking sheets: Two large, rimmed baking sheets. I line mine with parchment paper for easy cleanup and even baking.
- Cookie scoop: A 1.5-tablespoon scoop makes uniform cookies that bake evenly. If you don’t have one, use two spoons to portion the dough.
- Cooling rack: Essential for letting the cookies cool properly. If you leave them on the hot baking sheet, they’ll continue to cook and get overdone.
- Plastic wrap: For chilling the dough. You’ll thank me later.
Preparation Method
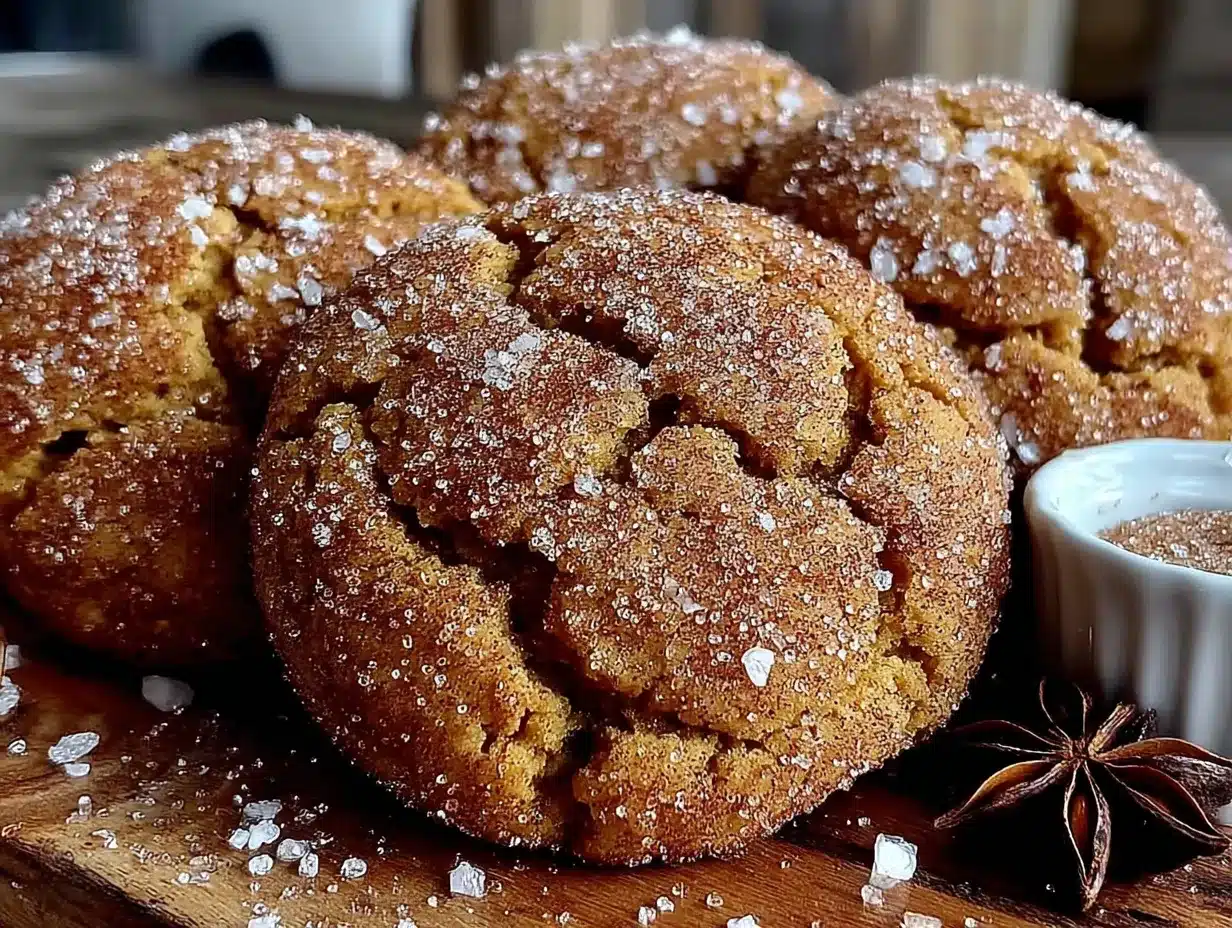
Alright, let’s get to the good part. Follow these steps, and you’ll have a batch of the best brown butter pumpkin snickerdoodle cookies you’ve ever made.
- Brown the butter. Place the 1 cup of unsalted butter in a light-colored saucepan over medium heat. Let it melt completely, then continue cooking, swirling the pan occasionally. The butter will foam up, then subside. Watch closely—you’re looking for the milk solids at the bottom to turn a golden amber color and smell nutty and toasty. This takes about 5-7 minutes. Once it’s done, immediately pour it into a heatproof bowl to stop the cooking process. Don’t walk away from the stove—brown butter can go from perfect to burnt in seconds. I may or may not have learned this the hard way.
- Cool the brown butter. Let the brown butter cool for about 10-15 minutes. It should be warm but not hot to the touch. If it’s too hot, it will cook the egg when you mix it in. You can pop it in the fridge for 5 minutes if you’re impatient like me, just keep an eye on it so it doesn’t solidify.
- Mix the dry ingredients. In a medium bowl, whisk together the 2 cups of all-purpose flour, 1 teaspoon cream of tartar, 1/2 teaspoon baking soda, 1/2 teaspoon salt, 1 teaspoon pumpkin pie spice, and 1 teaspoon cinnamon. Set aside.
- Cream the butter and sugars. In a large bowl, combine the cooled brown butter, 1 cup granulated sugar, and 1/2 cup packed light brown sugar. Beat with a hand mixer or stand mixer on medium speed for about 2-3 minutes, until the mixture is light and fluffy. It should look a bit like wet sand. Scrape down the sides and bottom of the bowl with a rubber spatula.
- Add the wet ingredients. Add the 1 large egg and 1 teaspoon vanilla extract to the butter-sugar mixture. Beat on medium speed until well combined, about 1 minute. Then, add the 1/2 cup pumpkin puree and beat again until smooth. The mixture might look slightly curdled at this point—that’s okay. Pumpkin is watery, and it can sometimes separate a little. It will come together once you add the flour.
- Combine wet and dry ingredients. Gradually add the dry ingredient mixture to the wet ingredients, mixing on low speed just until combined. Do not overmix! Overmixing develops the gluten and makes the cookies tough. You want to mix until you no longer see streaks of flour. Use your rubber spatula to give it a few final folds to make sure everything is incorporated.
- Chill the dough. This step is non-negotiable. The dough will be very soft and sticky because of the pumpkin. Cover the bowl with plastic wrap and refrigerate for at least 30 minutes, or up to 2 hours. Chilling the dough solidifies the fat, which prevents the cookies from spreading too much in the oven. A chilled dough also gives you a thicker, softer cookie. I’ve skipped this step before, and I ended up with flat, sad discs. Don’t be like me.
- Preheat the oven and prepare the coating. About 15 minutes before you’re ready to bake, preheat your oven to 350°F (175°C). Line two baking sheets with parchment paper. In a small bowl, mix together the 1/4 cup granulated sugar and 1 tablespoon cinnamon for the coating.
- Shape and coat the cookies. Using a 1.5-tablespoon cookie scoop or two spoons, portion out the chilled dough. Roll each portion into a smooth ball between your palms. The dough will still be slightly sticky, so wet your hands slightly with water if needed. Roll each ball generously in the cinnamon-sugar mixture, making sure it’s fully coated. Place the coated dough balls on the prepared baking sheets, spacing them about 2 inches apart. They will spread, but not too much if you chilled the dough.
- Bake. Bake for 10-12 minutes, or until the edges are set and the tops are slightly crackled. The centers will still look a little soft and puffy—that’s perfect. They will continue to set as they cool on the baking sheet. For a softer cookie, bake for 10 minutes. For a slightly crispier edge, go for 12. I usually bake mine for 11 minutes.
- Cool. Let the cookies cool on the baking sheet for 5 minutes. This is important—they are fragile right out of the oven. After 5 minutes, transfer them to a wire cooling rack to cool completely. If you try to move them too soon, they will fall apart. I’ve lost a few good cookies this way.
Cooking Tips & Techniques
After making these cookies more times than I care to count, I’ve picked up a few tricks that make the process smoother and the results more consistent.
Master the brown butter. The biggest mistake people make is not watching the butter closely enough. Once it melts, it goes from golden to amber to burnt very quickly. Swirl the pan constantly during the last minute. When you see the milk solids turn a deep golden color and smell that nutty aroma, pull it off the heat immediately. Pour it into a separate bowl to stop the cooking. I once got distracted by a delivery driver and ended up with black butter. The kitchen smelled terrible for hours.
Don’t skip the chill. I know it’s tempting to skip the chilling step, especially when you’re craving cookies. But the pumpkin adds a lot of moisture, and without the chill, your cookies will spread into thin, crispy wafers. If you’re in a hurry, you can scoop the dough into balls before chilling, then pop them in the freezer for 15 minutes. That works in a pinch, but the texture is best with a full 30-minute chill.
Use a cookie scoop for even sizing. Uniform cookies bake evenly. If some are bigger than others, the small ones will burn while the big ones are still raw. A 1.5-tablespoon scoop is my go-to for this recipe. It gives you a nice, bakery-style cookie that’s not too big and not too small.
Room temperature ingredients matter. I’m usually a “straight from the fridge is fine” kind of baker, but for this recipe, it makes a difference. A cold egg can seize the brown butter and make the dough lumpy. Let your egg sit on the counter for 30 minutes before you start. The same goes for the pumpkin puree—it doesn’t need to be fully room temperature, but let it sit out for 10 minutes to take the chill off.
Rotate your baking sheets halfway through. Most ovens have hot spots. Halfway through the baking time, swap the top sheet to the bottom rack and vice versa, and rotate them front to back. This ensures even browning and prevents one batch from being darker than the other.
Variations & Adaptations
One of the best things about this recipe is how flexible it is. Here are a few ways to make it your own:
- Gluten-Free Version: Swap the all-purpose flour for a 1:1 gluten-free baking flour blend. I’ve used Bob’s Red Mill 1:1 Baking Flour with great results. The texture is slightly more tender, but the flavor is spot on. Just make sure your blend contains xanthan gum for structure.
- Dairy-Free Option: Use a high-quality vegan butter stick for browning. Not all vegan butters brown the same way, so look for one with a higher fat content, like Miyoko’s or Country Crock Plant Butter. The flavor won’t be as rich, but it’s still delicious.
- Spice It Up: If you love a warm, spicy cookie, add 1/4 teaspoon of ground ginger and a pinch of ground cloves to the dough. I did this once when I was feeling adventurous, and it gave the cookies a lovely, almost chai-like warmth.
- Add Some Crunch: Fold in 1/2 cup of chopped pecans or walnuts after you’ve mixed the dough. The nuts add a lovely crunch that contrasts with the soft cookie. Toast the nuts first for extra flavor—just toss them in a dry pan over medium heat for 3-4 minutes until fragrant.
- Make Them Extra Fancy: After the cookies have cooled, drizzle them with a simple glaze made from 1 cup of powdered sugar, 2 tablespoons of milk, and 1/2 teaspoon of vanilla extract. It adds a sweet, creamy finish that’s perfect for holiday cookie exchanges.
- Pumpkin-Free Version: Believe it or not, you can make these without the pumpkin! Substitute the 1/2 cup pumpkin puree with 1/2 cup of unsweetened applesauce. The cookies will be a little less moist and the pumpkin flavor will be gone, but the brown butter and cinnamon-sugar coating still shine. I tried this when I ran out of pumpkin mid-batch, and they were surprisingly good.
Serving & Storage Suggestions
These cookies are at their absolute best when they’re still slightly warm from the oven. The edges are crisp, the centers are soft, and the brown butter flavor is at its peak. Serve them with a cold glass of milk, a hot cup of coffee, or a mug of spiced apple cider for the ultimate fall treat.
If you’re making them for a gathering, arrange them on a pretty plate or a wooden board. They look beautiful on their own, but you can also dust them with a little extra cinnamon sugar just before serving for that “wow” factor.
Storage: Store the cooled cookies in an airtight container at room temperature. They will stay fresh for up to 5 days. Place a piece of bread in the container with the cookies—the bread will absorb excess moisture and keep the cookies soft. I learned this trick from my grandmother, and it works like magic. Just replace the bread slice every couple of days.
Freezing: These cookies freeze beautifully. You have two options. First, you can freeze the unbaked dough balls. Scoop and roll them, then place them on a baking sheet and freeze until solid. Transfer the frozen dough balls to a freezer-safe bag. When you’re ready to bake, roll them in the cinnamon-sugar coating while still frozen and add 1-2 minutes to the baking time. Second, you can freeze the baked cookies. Let them cool completely, then place them in a single layer in a freezer-safe container with parchment paper between layers. They will keep for up to 3 months. Thaw at room temperature for about 30 minutes before serving.
Reheating: To revive that just-baked softness, pop a cookie in the microwave for about 10 seconds. For a crispier edge, warm it in a 300°F oven for 3-4 minutes. The flavor actually deepens after a day or two, so don’t be surprised if you like them even more on day two.
Nutritional Information & Benefits
Let’s be real—these are cookies, not health food. But they do have a few redeeming qualities! Here’s the estimated nutritional breakdown per cookie (based on 24 cookies):
- Calories: 165
- Fat: 8g
- Carbohydrates: 22g
- Protein: 2g
- Fiber: 1g
- Sugar: 14g
Pumpkin is a great source of vitamin A and fiber, which supports eye health and digestion. The cinnamon in the coating is packed with antioxidants and has anti-inflammatory properties. And hey, the brown butter might not be a superfood, but it sure does make life a little sweeter. Everything in moderation, right?
If you’re watching your sugar intake, you can reduce the sugar in the dough by 1/4 cup, but keep the coating as is—it’s what makes them snickerdoodles. For a lower-fat version, you could try using a pumpkin puree and applesauce blend, but I haven’t tested that, so I can’t vouch for the texture.
Conclusion
These brown butter pumpkin snickerdoodle cookies are everything I love about fall baking. They’re warm, spiced, cozy, and just a little bit indulgent. The nutty brown butter, the soft pumpkin center, and that crackly cinnamon-sugar top—it’s a combination that never gets old. Whether you’re baking for a holiday party, a weekend treat, or just because you need a little comfort, these cookies deliver every single time.
I hope you give them a try and make them your own. Maybe you’ll add extra cinnamon, or throw in some chocolate chips, or forget to chill the dough and end up with flat cookies that still taste amazing (I’ve been there). The beauty of baking is that even the “mistakes” are usually delicious. So go ahead, brown that butter, get your hands messy, and enjoy every bite. And when you do, come back and let me know how they turned out. I’d love to hear about your happy accidents.
Frequently Asked Questions
Can I use pumpkin pie filling instead of pumpkin puree?
No, I really don’t recommend it. Pumpkin pie filling has added sugar, spices, and sometimes thickeners. It will throw off the sweetness and texture of the dough. Stick with 100% pure pumpkin puree for the best results.
Why did my cookies spread too much?
This usually happens for one of two reasons: the dough wasn’t chilled long enough, or the butter was too warm when you mixed it. Make sure your brown butter has cooled to room temperature before creaming it with the sugar, and don’t skip the 30-minute chill. If your kitchen is warm, chill the dough for a full hour.
Can I make the dough ahead of time?
Absolutely! You can make the dough up to 3 days in advance. Keep it covered tightly in the refrigerator. When you’re ready to bake, let it sit at room temperature for about 10 minutes to soften slightly so you can scoop it, then roll and bake as directed.
Can I use salted butter instead of unsalted?
You can, but you’ll need to reduce the added salt in the recipe to 1/4 teaspoon. Salted butter can vary in salt content between brands, so it’s safer to use unsalted and control the salt yourself. I’ve used salted butter in a pinch, and the cookies were fine—just a tad saltier.
How do I know when the brown butter is done?
Look for a deep golden amber color and a nutty, toasty aroma. The milk solids at the bottom of the pan will turn brown. Swirl the pan constantly near the end, and as soon as you see that color and smell that nuttiness, pull it off the heat immediately. Pour it into a bowl to stop the cooking process. If you see black specks, you’ve gone too far—start over.
PrintThe Best Brown Butter Pumpkin Snickerdoodle Cookies
These brown butter pumpkin snickerdoodle cookies are the result of a happy accident, refined over a dozen batches. They feature a nutty brown butter base, soft pumpkin center, and a crackly cinnamon-sugar coating, making them the ultimate fall treat.
- Prep Time: 30 minutes
- Cook Time: 11 minutes
- Total Time: 1 hour 11 minutes (including 30 minutes chilling)
- Yield: 24 cookies 1x
- Category: Dessert
- Cuisine: American
Ingredients
- 1 cup (2 sticks) unsalted butter
- 1 cup granulated sugar (for dough)
- 1/4 cup granulated sugar (for coating)
- 1/2 cup light brown sugar, packed
- 1/2 cup pumpkin puree (not pumpkin pie filling)
- 1 large egg, at room temperature
- 1 teaspoon vanilla extract
- 2 cups all-purpose flour
- 1 teaspoon cream of tartar
- 1/2 teaspoon baking soda
- 1/2 teaspoon fine sea salt
- 1 teaspoon pumpkin pie spice
- 1 teaspoon cinnamon (for dough)
- 1 tablespoon cinnamon (for coating)
Instructions
- Brown the butter: Place 1 cup unsalted butter in a light-colored saucepan over medium heat. Melt completely, then continue cooking, swirling occasionally, until the milk solids turn golden amber and the butter smells nutty (about 5-7 minutes). Immediately pour into a heatproof bowl to stop cooking.
- Cool the brown butter: Let it cool for 10-15 minutes until warm but not hot. You can refrigerate for 5 minutes if needed, but watch so it doesn’t solidify.
- Mix dry ingredients: In a medium bowl, whisk together 2 cups all-purpose flour, 1 teaspoon cream of tartar, 1/2 teaspoon baking soda, 1/2 teaspoon salt, 1 teaspoon pumpkin pie spice, and 1 teaspoon cinnamon. Set aside.
- Cream butter and sugars: In a large bowl, combine cooled brown butter, 1 cup granulated sugar, and 1/2 cup packed light brown sugar. Beat with a hand mixer or stand mixer on medium speed for 2-3 minutes until light and fluffy. Scrape down the bowl.
- Add wet ingredients: Add 1 large egg and 1 teaspoon vanilla extract. Beat on medium speed until combined, about 1 minute. Add 1/2 cup pumpkin puree and beat until smooth. The mixture may look slightly curdled.
- Combine wet and dry ingredients: Gradually add dry ingredients to wet ingredients, mixing on low speed just until combined. Do not overmix. Use a rubber spatula to fold a few times to ensure everything is incorporated.
- Chill the dough: Cover the bowl with plastic wrap and refrigerate for at least 30 minutes, or up to 2 hours. This step is non-negotiable for thick, soft cookies.
- Preheat oven and prepare coating: About 15 minutes before baking, preheat oven to 350°F (175°C). Line two baking sheets with parchment paper. In a small bowl, mix 1/4 cup granulated sugar with 1 tablespoon cinnamon for coating.
- Shape and coat cookies: Using a 1.5-tablespoon cookie scoop, portion out chilled dough. Roll each portion into a smooth ball. Roll generously in the cinnamon-sugar mixture. Place on prepared baking sheets, spacing 2 inches apart.
- Bake: Bake for 10-12 minutes, until edges are set and tops are slightly crackled. Centers will look soft and puffy. For softer cookies, bake 10 minutes; for crispier edges, bake 12 minutes.
- Cool: Let cookies cool on baking sheet for 5 minutes, then transfer to a wire cooling rack to cool completely.
Notes
Don’t skip chilling the dough—it prevents spreading. Brown butter can burn quickly, so watch closely. Use room temperature egg for best texture. For even baking, rotate baking sheets halfway through. Store cookies with a slice of bread to keep them soft.
Nutrition
- Serving Size: 1 cookie
- Calories: 165
- Sugar: 14
- Sodium: 95
- Fat: 8
- Saturated Fat: 5
- Carbohydrates: 22
- Fiber: 1
- Protein: 2
Keywords: brown butter, pumpkin, snickerdoodle, cookies, fall, pumpkin cookies, snickerdoodle cookies, brown butter cookies


